



Beware of DPI – DeLorean Performance Industries

If you’re a DeLorean owner, you know there aren’t a lot of shops or parts houses to choose from when you need stuff for your DMC. And with so few shops, it’s frustrating when yet another DeLorean business engages in dishonest practices. First, it was Fake DMC in Texas, and now it’s perfectly clear that DPI – DeLorean Performance Industries is trying to scam people too (or, more.) In recent weeks, DPI purchased ads on Google Search (using Google AdWords) where they use the names of GOOD and TRUSTWORTHY DeLorean shops – but he’s using his own web address when you click the ad. Long-time DeLorean owners won’t (or shouldn’t) fall for that misleading tactic, but newer DeLorean owners – or those shopping for a DeLorean – absolutely would fall for it. This is untruthful and disgusting. The good and trustworthy shops being maligned in this case, are DeLorean Parts Northwest / DeLorean Service Northwest, DeLorean Midwest, and DeLoreanGo. DPI is paying for ads using each of their names, but linking to his own website. Click the images below to see the unscrupulous screenshots: DeLorean Performance Industries already had a shady past with their deficiency in customer service and their lack of ‘attention to detail’ that they tout so much. Apparently, they don’t really live up to their motto. Just ask around in the community. Plus the time (that we know of,) that DPI tried to steal money from a DeLorean owner by shorting their order, but wouldn’t issue a refund… that is, until the customer finally got the credit card company to do a chargeback, and suddenly DeLorean Performance Industries responded – by posting the customer’s bank account information on facebook! Yeah – DPI is not to be trusted. Furthermore, with Google AdWords, you can put up or take down ads basically immediately. Yet these double-dealing ads have stuck around for at least two weeks. We sent an email to both email addresses we found on the DPI website, asking for clarification on why they were posting these deceptive ads – telling them we were going to post an article if they didn’t have a good answer – and they never replied. Which means, a) they don’t pay attention to the customer service emails, or b) they don’t have a reasonable excuse for their deceitful actions. What to do now? Have some fun… GO SEARCH for DeLorean Parts Northwest / DeLorean Service Northwest, DeLorean Midwest, and DeLoreanGo on Google – and when you see the “Sponsored” link at the top that shows DPI – CLICK IT! Then do the same search on your mobile device, and click the ad AGAIN… then have your spouse, mom, co-worker, and anyone else nearby do the same… He gets charged more for each click, than for just the visual impression.
3M Scotch-Brite Blending Pads
The 3M Scotch-Brite (#7446) blending pads are the correct pads for hand blending the stainless steel finish on the DeLorean. They provide similar performance as steel wool grade 3 without shredding during use, rusting after use, or leaving fine metal splinters to rust in the grain of the stainless.
Get “En-light-ened”
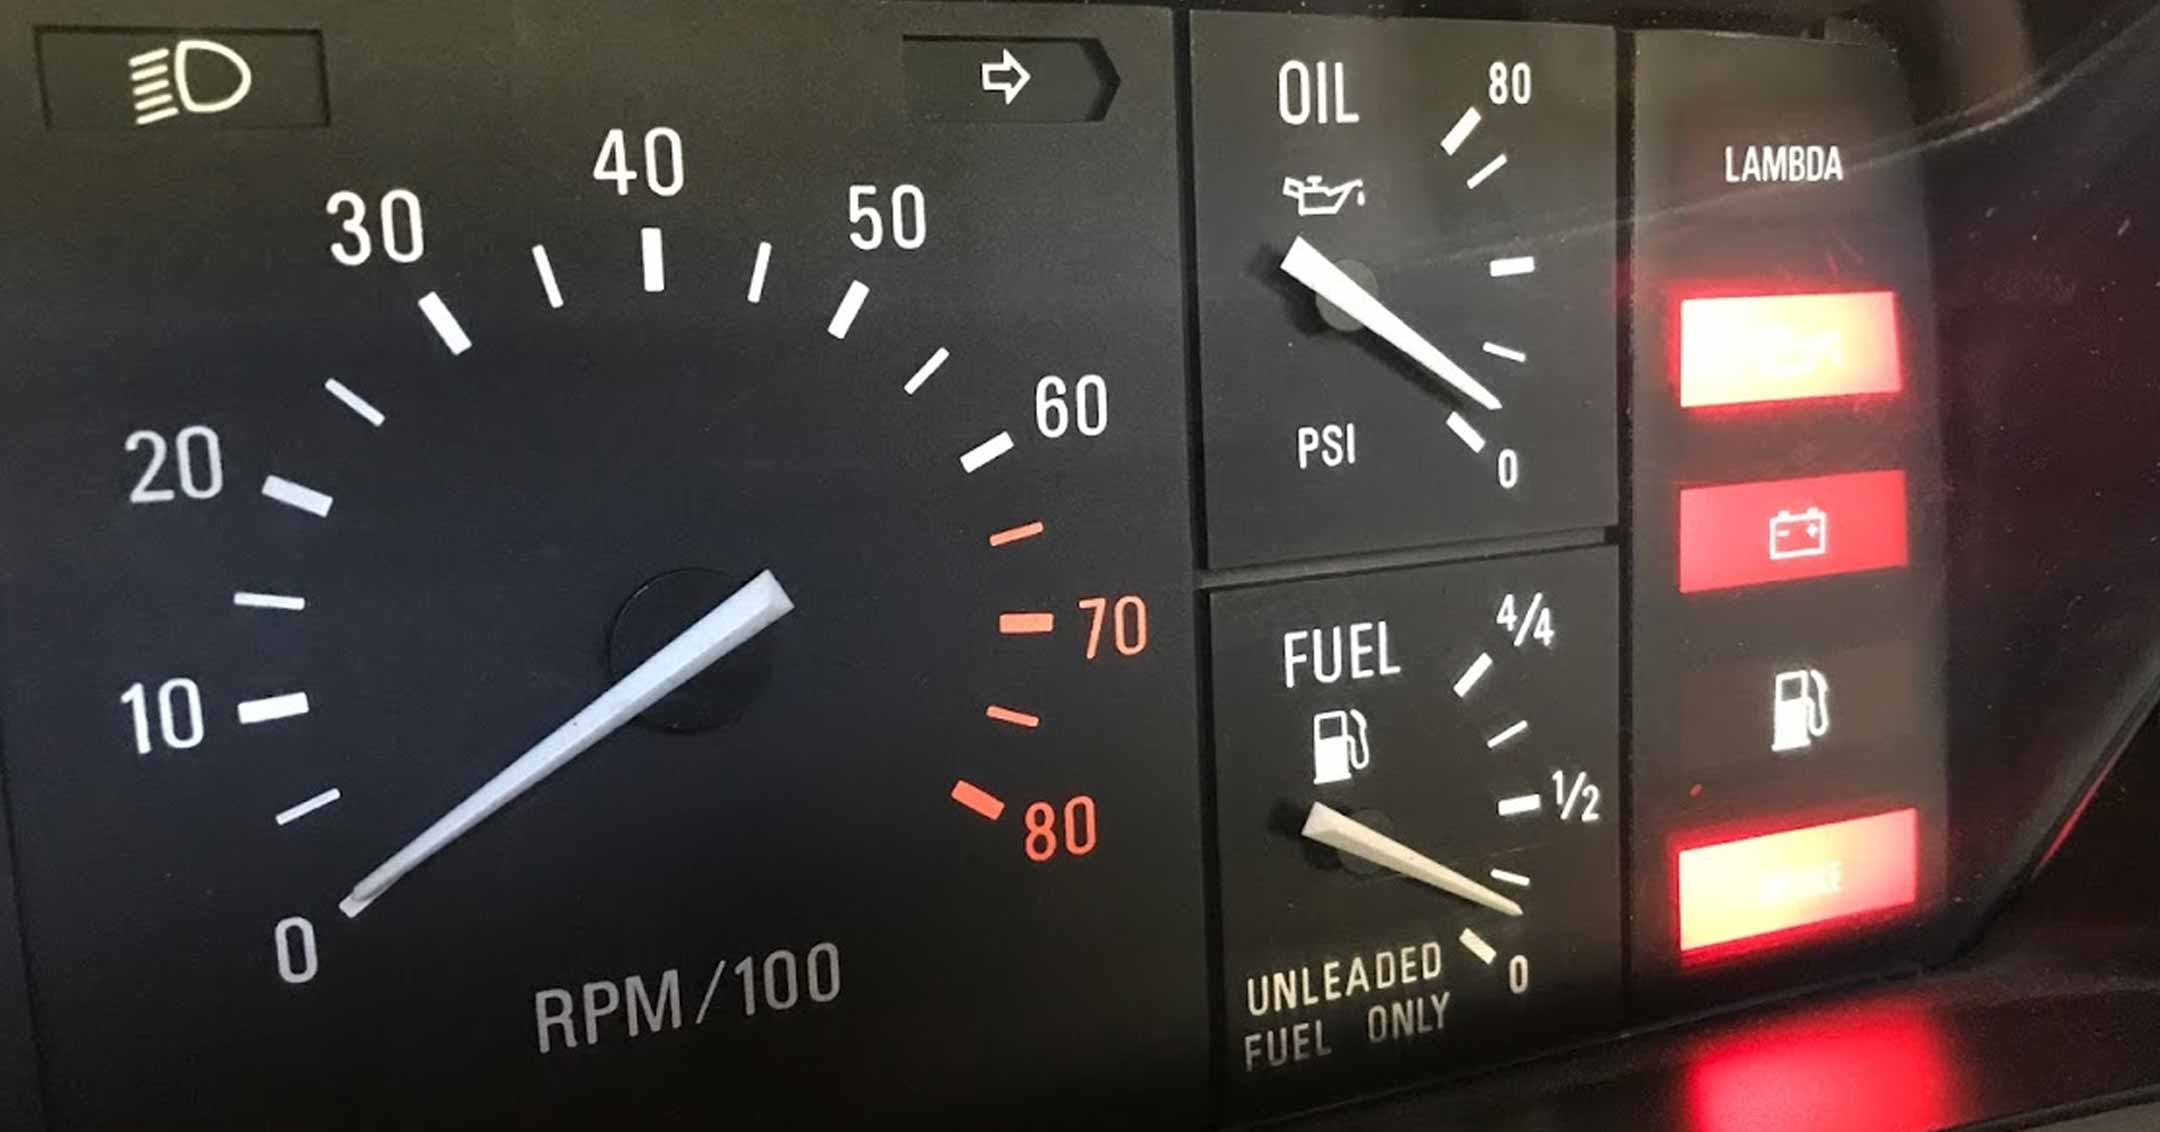
by Chris Miles, VIN: 16409 As I’ve been helping more and more DeLorean owners with their cars, I’ve been hearing reports of their cars just dying. They’re either driving on the road and lose power, or they’re unable to re-start the car after a short stop. The first thing people tend to think is that they have a bad battery or alternator, but that isn’t always the case. As a pretty technically-skilled DeLorean owner, I’ve made myself intimately familiar with the instrument cluster and related electrical components. Unlike modern cars, the DeLorean has a finite number of warning lights. The two most important warning lights are the oil pressure light and battery light. The oil pressure light comes on when the engine is running and has low oil pressure – which means you should pull over immediately and shut the car off right away. The battery light is just as important as the oil pressure light. However, many owners never pay attention to whether the battery bulb lights up at all. The bulb is supposed to illuminate – and stay on – when you switch the ignition to position 2, but it will then turn off when you start the engine. (NOTE: if you have a DMC Houston alternator, the light may just flash in position 2.) If the battery light remains on after starting, that indicates you have a charging issue. However, if your battery light does not illuminate at all in ignition position 2, you’re probably going to have an issue with the charging circuit – or – the battery bulb is simply burnt out. I’ve helped a few owners diagnose their battery issues, so I want to stress that you should check your battery light the next time you start your DeLorean. So, what if you don’t see the battery light illuminate in ignition position 2? That means the alternator will not charge the battery. Eventually, the lights and engine will completely drain the battery. Sometimes this happens while you’re driving and there’s not enough power to spark the spark plugs and your engine will just die – but most often, there’s just not enough amps to start the car again. Again, it could just be that your battery bulb is burnt out (or, when you upgraded the binnacle lights to LEDs, you replaced the incandescent bulb with an LED instead of a new incandescent, and that’s bad – keep reading.) But, it could mean that you need to check your alternator wiring. Most DeLoreans now have a Motorola or some type of GM alternator. Both have a single wire that connects to the battery bulb circuit. The DeLorean battery light wire that connects to the alternator is brown with a yellow stripe. If you have a solid brown wire connected to your alternator, you’ll probably have an issue with charging the battery. The original Ducellier alternators used both the brown and brown/yellow stripe wires. The modern GM style alternators use a Dorman 85854 or 85118 oval connector – in which only one wire connects to the brown/yellow striped wire on DeLorean wiring harness. (see photo for my installation.). Having a functional battery light is also important, because it’s a warning that your water pump may not be spinning, since the alternator belt turns the water pump too. So, if you lose that belt, the alternator quits spinning and the battery light will illuminate – which also means you should immediately pull over and turn the car off, because you may end up overheating. And finally, a note on upgrading the light bulbs in the binnacle to LED. It’s fairly well known that the “battery” bulb must remain incandescent. The battery light circuit is designed to check for the resistance of an incandescent bulb. LED bulbs have less resistance than normal bulbs, so the circuit won’t work properly, and the bulb will not illuminate – which also means you will likely have charging issues. So, when upgrading your binnacle lights to LEDs, DO replace the original battery light bulb with a NEW incandescent bulb. Now you should be “en-light-ened” about this quirk of the DeLorean.
Air Filter Update
by Chris Miles Many people in the car world like simple upgrades to make their cars better and more efficient. One of those upgrades is about making the car “breath” better. If you have already done the “cold air intake” modification, then there is one other thing you can do – replace your paper air filter with a reusable K&N air filter. For many years, K&N has been a trusted name in automotive performance upgrades. Some DeLorean owners might be reading this and saying to themselves “this isn’t news to me, I already have a K&N filter in my car.” That may be true, as K&N used to make an air filter for a PRV Volvo that fit the DeLorean. K&N discontinued that filter, and they are becoming hard to find. Some vendors might have stocked up of that part, or are selling a different K&N filter that also fits the DeLorean. So, I decided to research this myself and found a filter that K&N makes for a modern car. Taking the dimensions of a stock DeLorean NOS filter, I searched K&N’s catalog for filters that matched as closely as possible. It turns out that the filter used in the Mercedes C Class closely matches the dimensions of the DeLorean filter. The part number is 33-3072. I ordered one at AutoZone and brought in my DeLorean air box to test fit the new K&N filter. It fits snugly and makes a good seal. I think it actually fits better than the Volvo application (#33-276) (see pictures below). The filter retails for about $55. If you buy it locally, you get the benefit of an easy warranty exchange should you ever need to replace it. Some people have their own opinions about the effectiveness of K&N filters – in that case, they should continue to use the standard paper filters. For everyone else, the K&N filter may be a long-term solution for finding a good air filter for your DeLorean. Check the crossover-parts list for other places to buy the air filter, as well as other parts. [telaalbums album=”Air Filter Update”]
Cold Air Intake Update
by Chris Miles photos by @DeLoreanTech When the DeLorean was built, it included systems that allowed the car to perform well in all operating environments. That includes operating in very cold weather. Since most owners only drive their cars in “nice” weather, an easy improvement can be made that can simplify the car and potentially increase performance. Many modern car enthusiasts upgrade their cars to make them breath better by utilizing cold air intake systems, which allow engines to take in more cool and fresh air. A similar modification can be done to the DeLorean. As designed, the DeLorean has a temperature controlled valve that allows warm air coming off the exhaust manifold to be piped into the engine during cold operation. When the car has warmed up, the valve closes to the hot air, and pipes cold air into the engine. By removing the old warm air valve, and installing a full-time cold air intake tube, you remove the possibility of a stuck valve (which would continuously deliver hot air,) and you streamline the air intake. Head down to your local auto parts store and look for a Spectre Air Duct Hose #8741 (O’Reilly; Advance Auto Parts; AutoZone). It’s a corrugated flex hose that installs in place of the original equipment. You can also get the hose in silver, blue, and red.
LED crossover parts

There are many reasons to replace all of the lights in the DeLorean with LED equivalents. For those who show the car at car shows and other events where you most likely have the doors open/up, having LEDs in the door markers means the battery won’t go dead in a few hours, like it would with the original incandescent bulbs. If you have LEDs in the front and side markers and the rear running lights, as well as the center console and dashboard / instrument cluster, and front and back interior lights, then you can turn on all your lights to really show off! Another good reason to replace everything with LEDs is the power draw – regardless of battery usage. The LEDs use less power, and put off MUCH less heat. Luckily, there are options to replace EVERYTHING (even the headlights!) on the DeLorean… www.DeLoreanDirectory.com/led-crossover-parts
Bar Keepers Friend Soft Cleanser
Tried, and true… the liquid Bar Keepers Friend soft cleanser does a great job finishing the stainless. You can also use the powered stuff, but the premixed bottles make the already work-intensive process a bit easier. Only work on “small-ish” areas at one time, as the liquid often dries faster than you want, which means more work to clean it off. If you start one the right (or left) half of the hood, always work WITH the grain (obviously,) by either wetting the surface, then squirting on a healthy amount of BKF, and giving it a good, deep clean. You can also squirt it right onto a wet cloth and work one area at the time, between wash-downs. Keep in mind – after you do a good cleaning with the BKF, you’ll still want to wash the car afterwards, and/or use some stainless steel cleaner to bring out the final shine. It’s quite amazing how much better the stainless looks after BKF.
90 Degree Fuel Filter Fitting
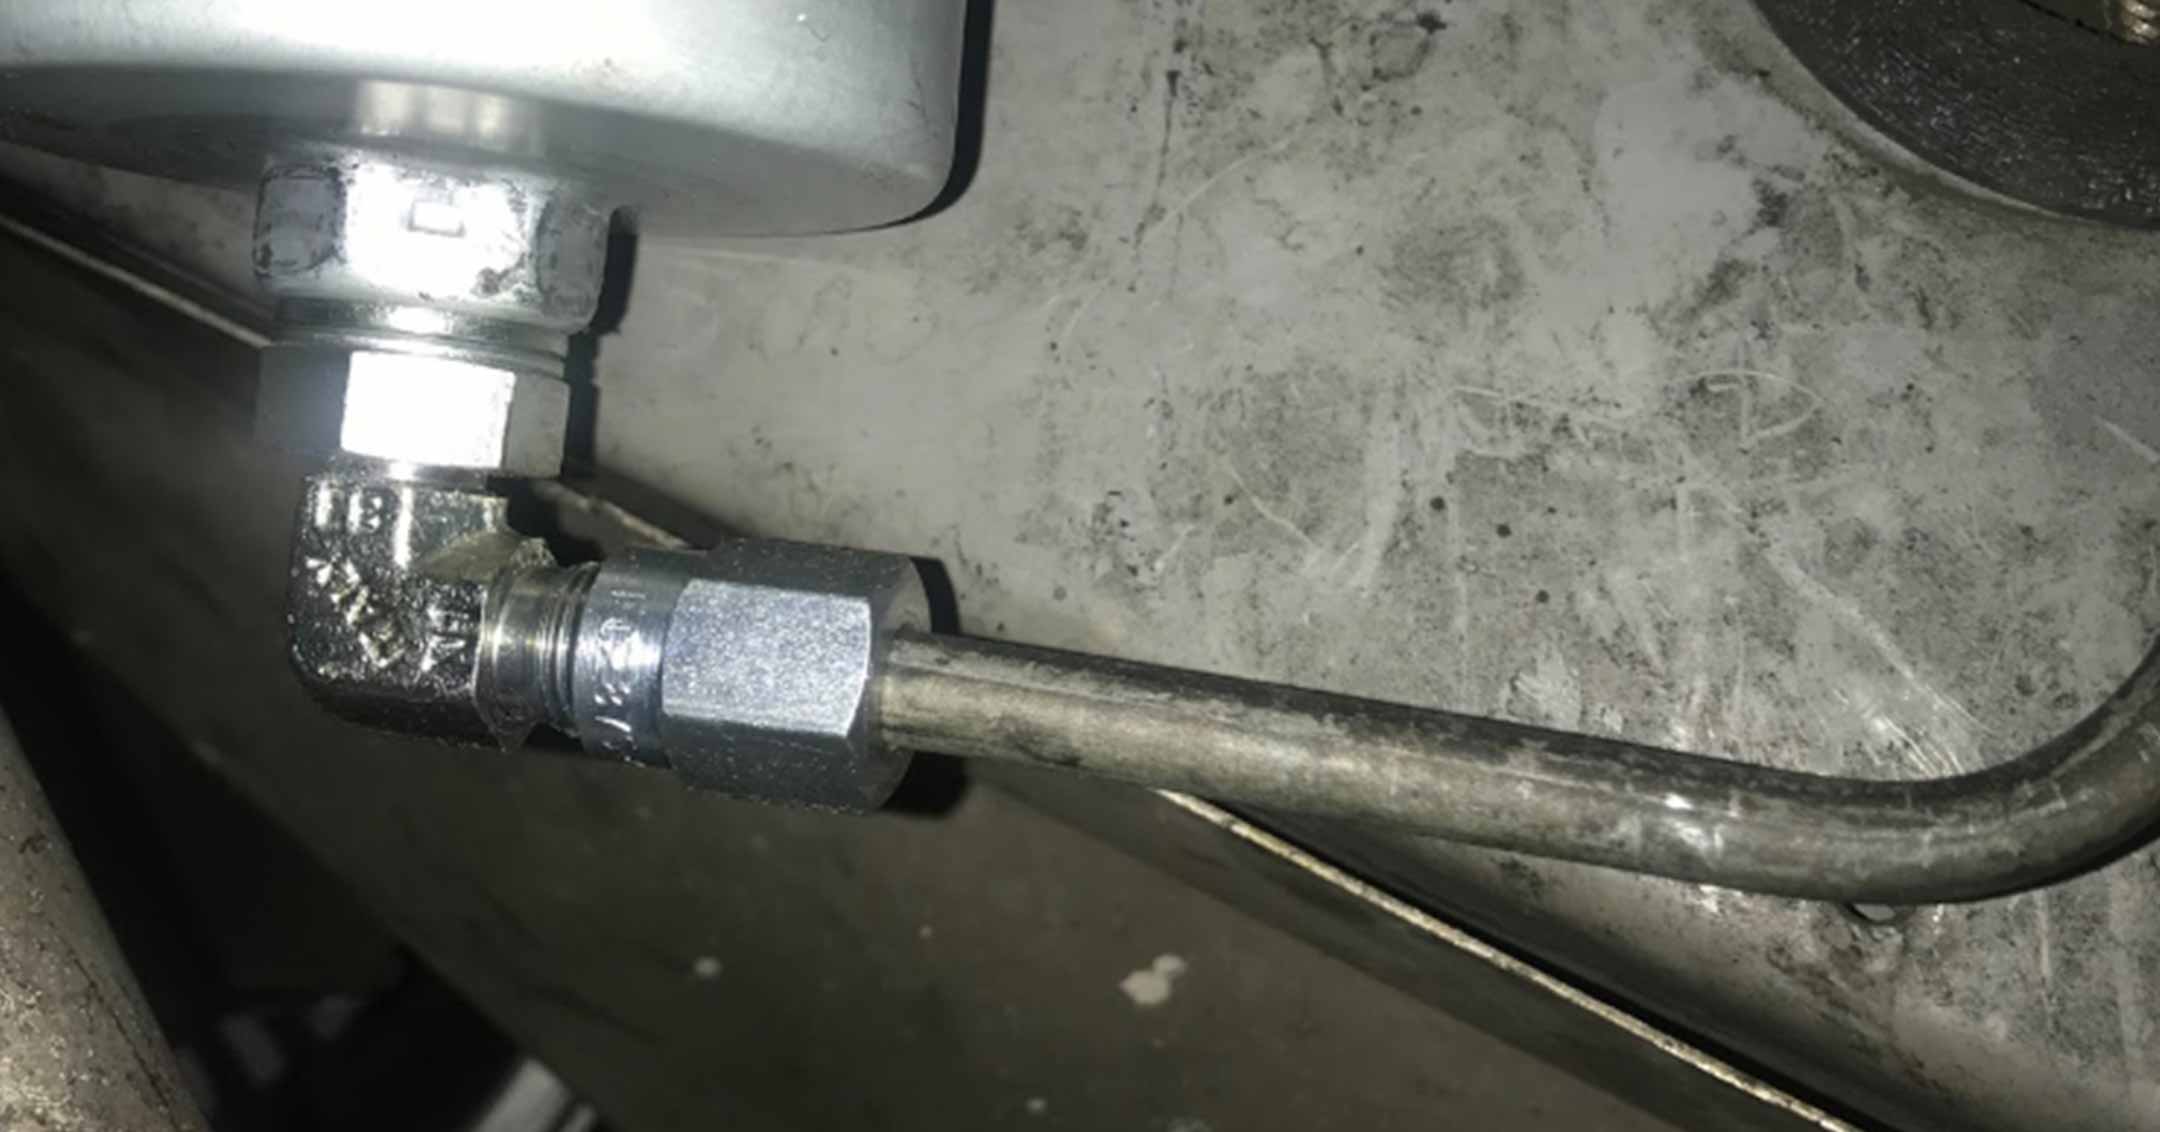
by Ryan Foster (VIN #06668) Have you installed a new fuel filter, just to start up the DeLorean and see fuel pouring out from the filter that you just installed? Well, that stock 90-degree fitting is usually the culprit. I recently experienced this problem myself. When I was installing the new fuel filter, I cranked on the compression fitting, and for the life of me could not get the hard line that goes into the filter to stop leaking. So, I got in contact with Josh at Delorean Performance industries (DPI) and he told me he had an updated 90-degree fitting that can be reused, and doesn’t need to be so tight. I ordered it right away. The kit comes with a new fuel filter, the elbow and copper washers needed to install. Part number 100523K. Below is a pic of the new elbow installed. The kit is very easy to install. Just install the elbow to the filter. No thread sealer needed. Install it dry. You’ll need a small tubing cutter (picked up at a local hardware store) to cut the end of the hard-line off as close to the end as possible. WARNING: Do not use a grinder or a cut off wheel as you will create heat and sparks and there is fuel in the line. The old elbow off the car looks like this: You can see how much of the line had to be removed to get the compression fitting off. The new elbow is reusable, and if you need a new compression fitting, DPI sells those too. Job takes about 45 mins tops using basic tools.
303 Aerospace Protectant

303 Aerospace Protectant is quite amazing. It brings back the ‘black’ of the rubber and plastic on the DeLorean, and protects it at the same time. It’s especially noticeable when you give your louvre / sunshade a good spray-down, then LEAVE IT for a day or two to soak in, then wipe it down. Although it isn’t cheap, it’s a great product that many DeLorean owners recommend. Made by 303 Products
Optimum Opti-Bond Tire Gel
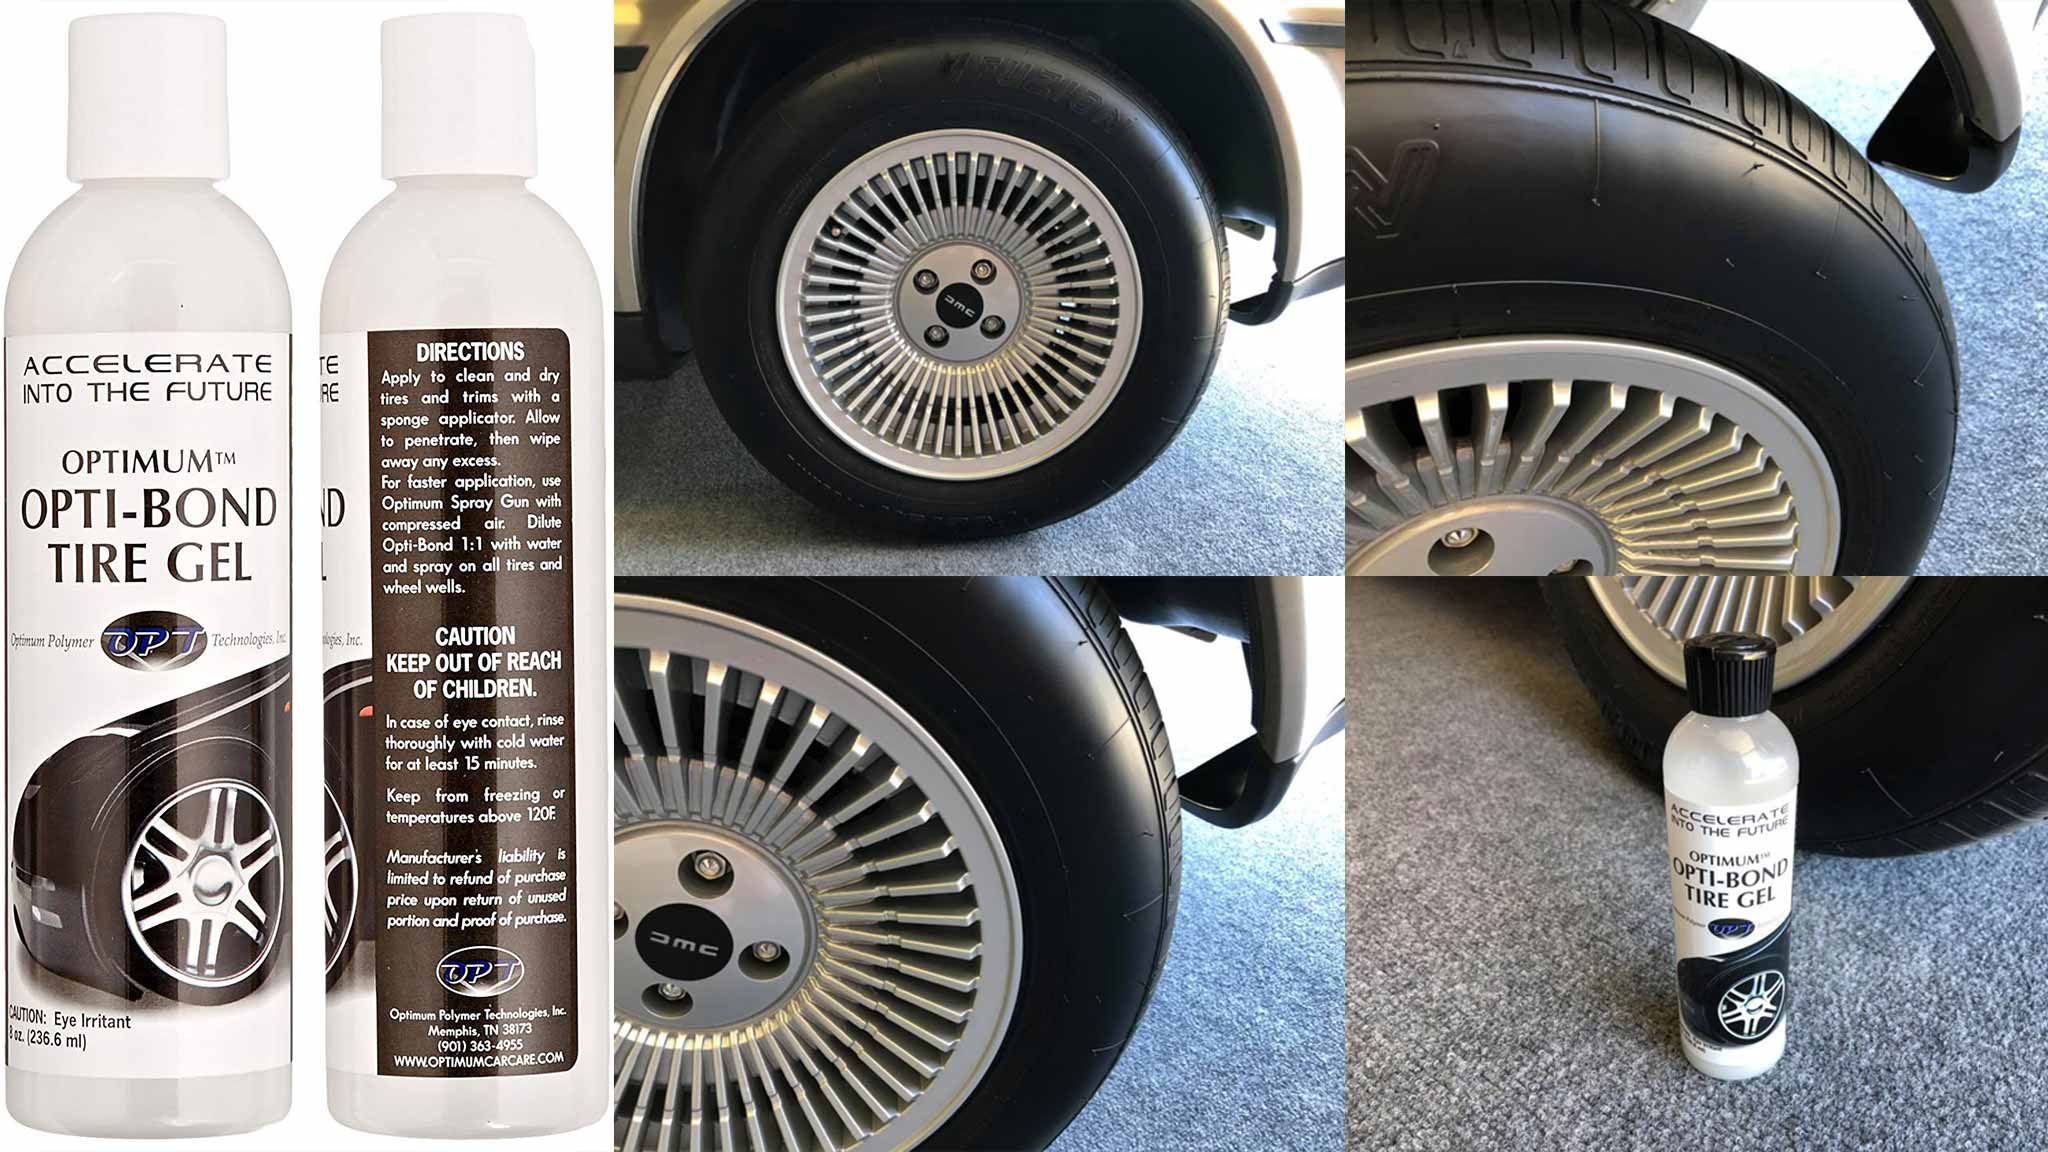
If you’ve been looking for that ‘clean’ tire dressing that doesn’t make your DeLorean tires look like they’ve been dipped in a swimming pool, try “Opti-Bond Tire Gel.” “This stuff is friggin amazing. Balances out the rubber, hides discoloration imperfections, and makes them look like showroom-new tires – with a very low-gloss, eggshell-like finish.” – NorCal DeLorean Club Member [flickr_tags tags=”DD11267″]
What?! My Battery is Dead?!
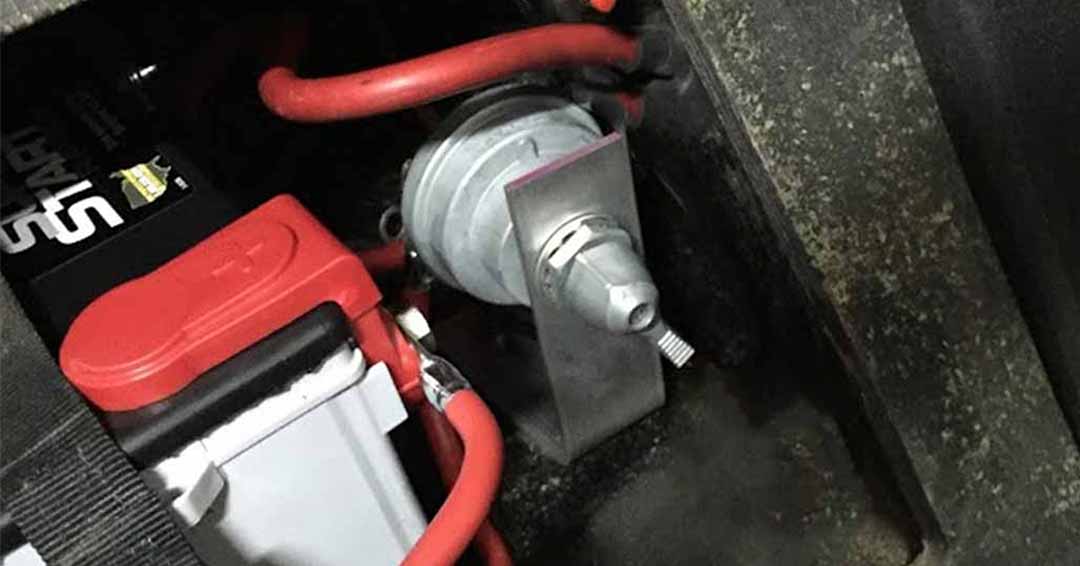
by Chris Miles Many DeLoreans suffer from vampiric battery drain if the car is parked for too long. How many times have you wanted to take the DeLorean out for a drive, just to turn the key and find out your battery is dead? The battery cut off switch is not a new idea. However, some of us probably have an inexpensive switch that we just live with. Others don’t have one at all. While it’s best to make sure you don’t have some underlying issue, a battery cut off switch will prevent your battery from draining if you do not operate your car regularly. Especially for owners who store their cars in the winter, a battery cut of switch is almost a must. It’s also a convenient way to disconnect the battery whenever you want to work on the car. I never like messing with the battery cables if I don’t have to. With a battery cut off switch it may also eliminate the need to have your car on a trickle charger. The Pollak Master Disconnect Switch is my favorite, as it’s a very heavy duty battery cut off switch that outperforms your run of the mill switch from Harbor Freight, or your favorite discount auto parts store. Pollak has been manufacturing these switches for many, many years. Over the span of production they have been made in the USA, Mexico, India, and most recently Taiwan. If you watch eBay, you can usually find New Old Stock USA made Pollak switches. Just beware of the cheaper Chinese knockoffs, as they do not have the Pollak stamp on them. Over the years many people have installed these switches by drilling a hole through the battery access door. I am not the biggest fan of doing this because I don’t want to damage the original battery cover. Or, the switch could rub or dig into the back of the passenger seat, which is more costly to repair/replace. I prefer to make a bracket to mount the switch inside the battery cubby. You will also need to buy one 2 foot battery cable to run between the battery and the switch. You can pick one of these up at your favorite auto parts stores, or on Amazon or from O’Reilly Auto Parts. For installation, I connect the positive battery cable to one stud on the switch. I then run the new 2 foot battery cable to the other stud.
DeLorean RPM Relay
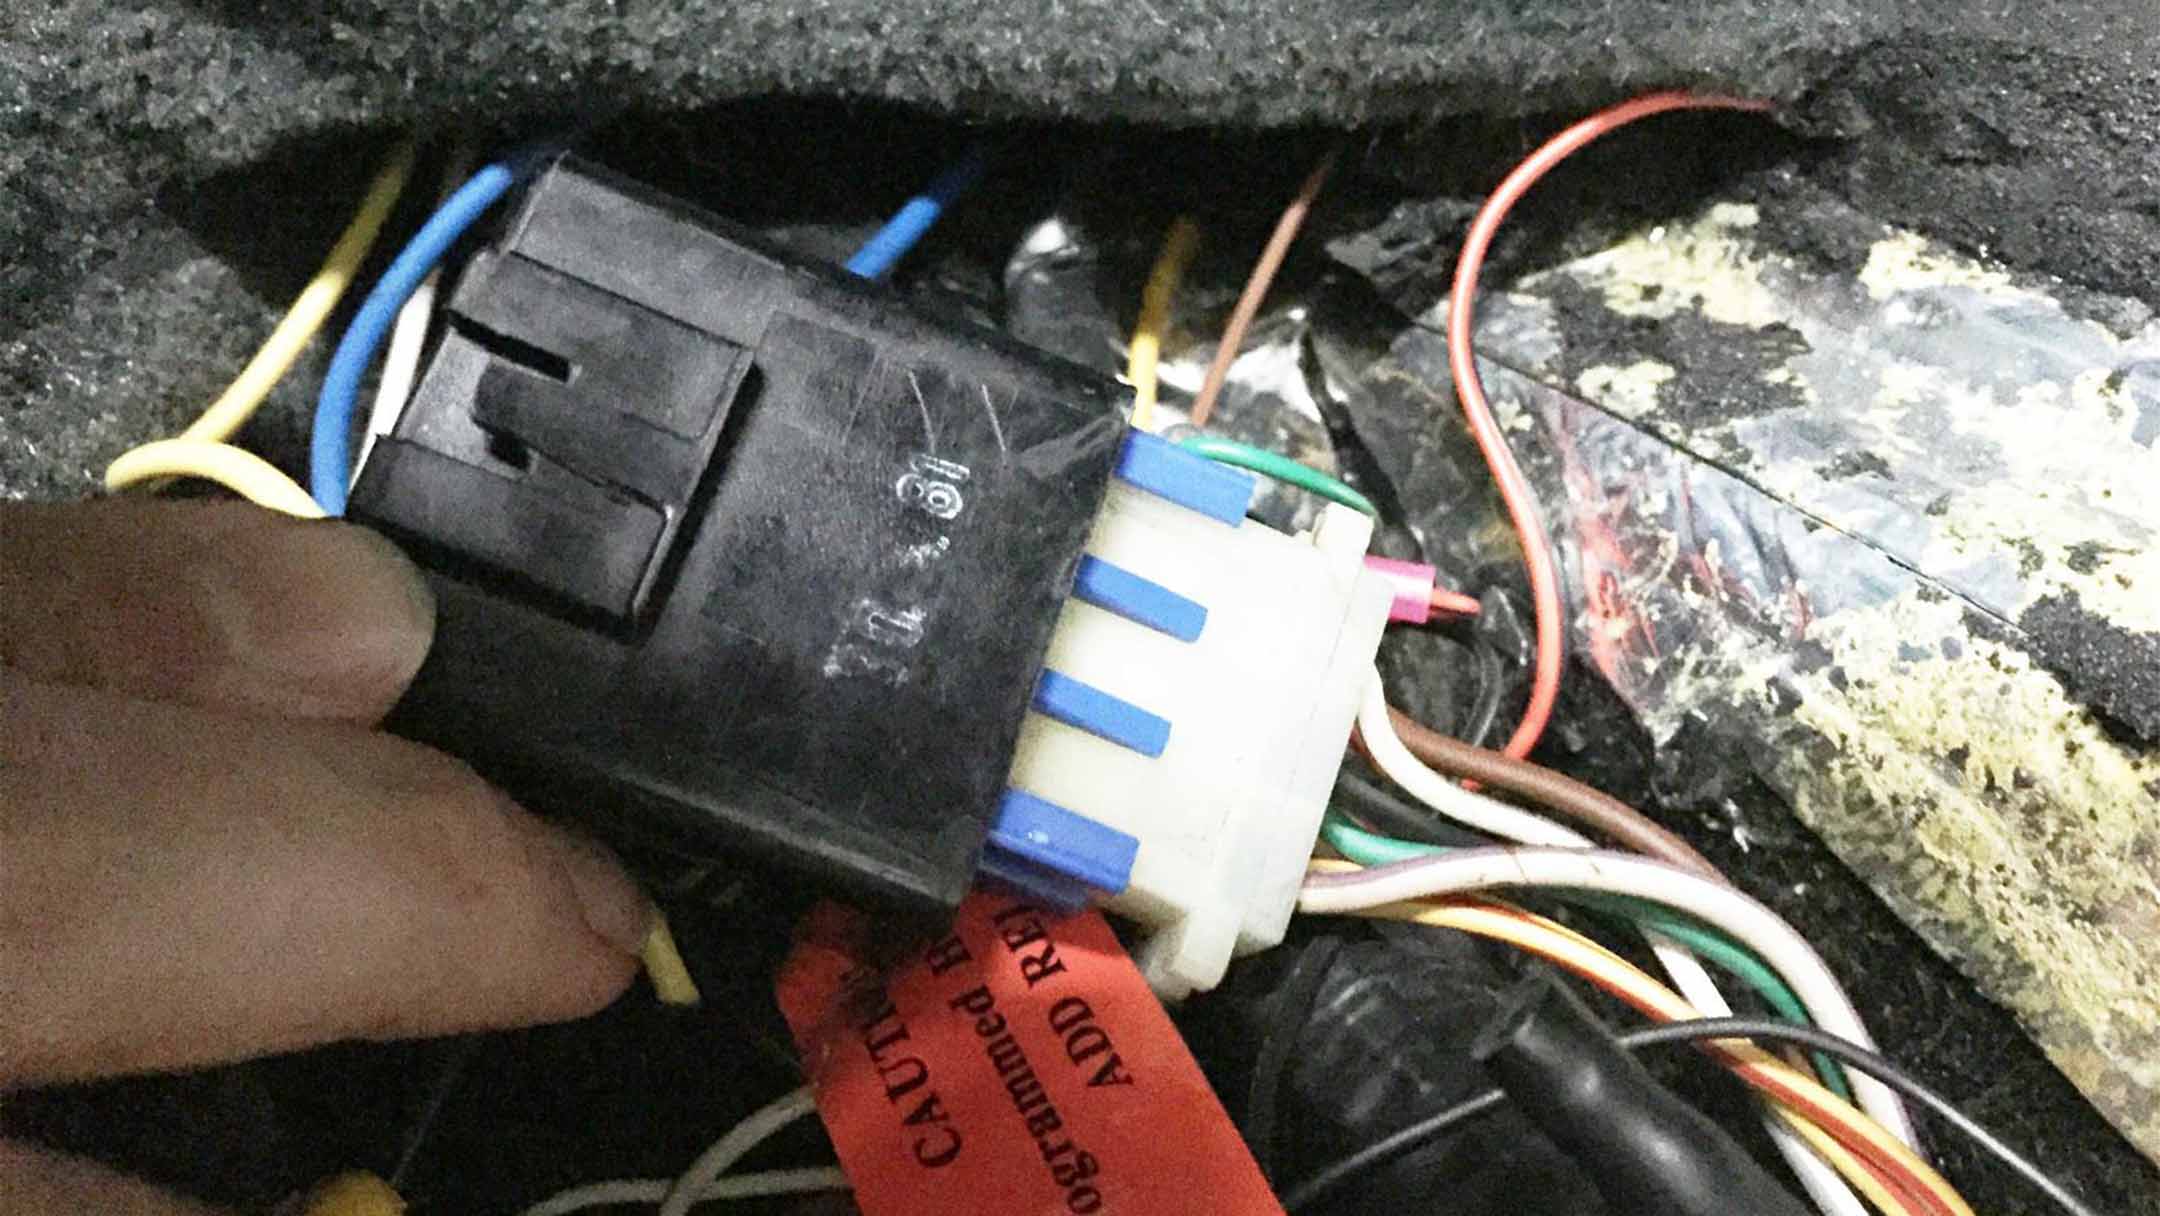
by Chris Miles The RPM relay is essential for fuel pump operation. It powers the fuel pump when it detects an RPM signal, meaning there’s an ignition signal, and the engine is turning over. It’s a black six pin relay usually found mounted to the underside of the relay tray behind the passenger seat. Or, just look for the large relay similar to this photo. If the relay fails, you can be left stranded, and you likely won’t get a warning of a failing RPM relay ahead of time. To avoid RPM relay issues, I recommend buying Dave McKeen’s solid state RPM relay (https://dm-eng.weebly.com – use the “Contact Email” link at the top of his page for pricing). Unlike the original RPM relay, McKeen’s solid state relay runs cool and will essentially last forever. Since the RPM relay is essential for running the car, why rely on a 30+ year old piece of technology. Dave will rebuild your original relay with solid state components, or you can send him a compatible relay to rebuild. Search eBay and other websites for Volvo relays. You can also go to junkyards and search for 1980s Volvos (commonly Volvo 240s) for compatible relay cores. If you send McKeen one of the Volvo relays, you can keep your original DMC relay as a spare. Alternatively, please see my for sale link here (RPM Relay Core),if you would like to buy a relay core from me. This photo gives you an idea of what to look for on the INSIDE of the Volvo relays. Make sure the pins “stacked” when they attach to the circuit board. Other relays cannot be re-used for McKeen’s conversion. I’ve been using these relays in both of my DeLoreans since about 2010 and they work great. If you don’t want to spend the money for McKeen’s relay, it’s not a bad idea to make a three-wire lead you can use to jumper the RPM relay socket in case of emergency. The three wires are all connected to each other at the top (so that they make a single circuit,) and when plugged in as the photo shows, the fuel pump circuit will be powered – allowing you to get home and buy a new RPM relay.
DeLorean Alternator Tensioner
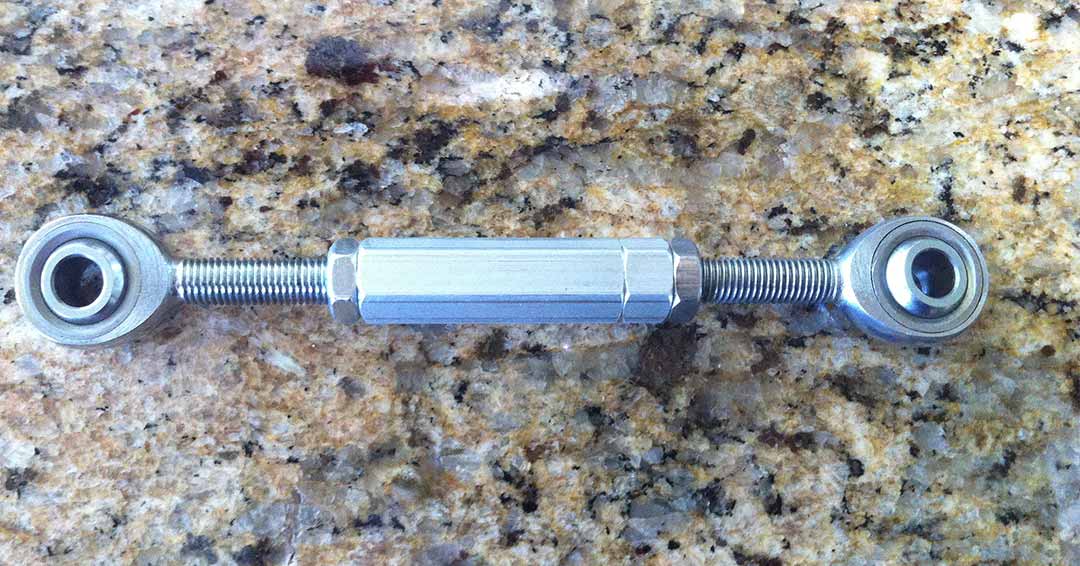
by Chris Miles If you’ve ever had to replace the alternator / water pump belt (or just adjust it,) you know what a pain it is – especially if you’re broken down on the side of the road! So, to make it easier, I have been using a turnbuckle style alternator tensioner. It’s made from parts sourced from McMaster Carr. You don’t need to install this now, but it’s a good idea to have it in your car, so that you can install it the next time you replace the belt. (You SHOULD have a spare belt in the car too – Gates #7495 – www.rockauto.com/en/moreinfo.php?pk=3913&jsn=10393) You’ll be replacing the existing alternator tensioner bracket (DMCT Part#: 110102) with this new tensioner. Here are the parts you’ll need to build this replacement bracket: Remember, you’ll also need a long enough bolt to go through the rod end into the alternator itself. Check your YOUR alternator bolt size, and get one about 1/2″ longer than the current size. The coupler accepts a ½ inch open-end wrench. Simply rotate the coupler to extend the tensioner, which pushes the alternator away from the water pump pulley, thus tightening the belt. I’ve been using these on both of my DeLoreans for years, and have never had an adjustment problem. At the time of this writing, the rod ends were about $14 each, and the coupler nut was $18. The jam nuts are probably less than $1 each. For about $50, you can have piece of mind that you can replace your broken or damaged alternator belt on the side of the road quickly and easily.
ASI Radio User Manual
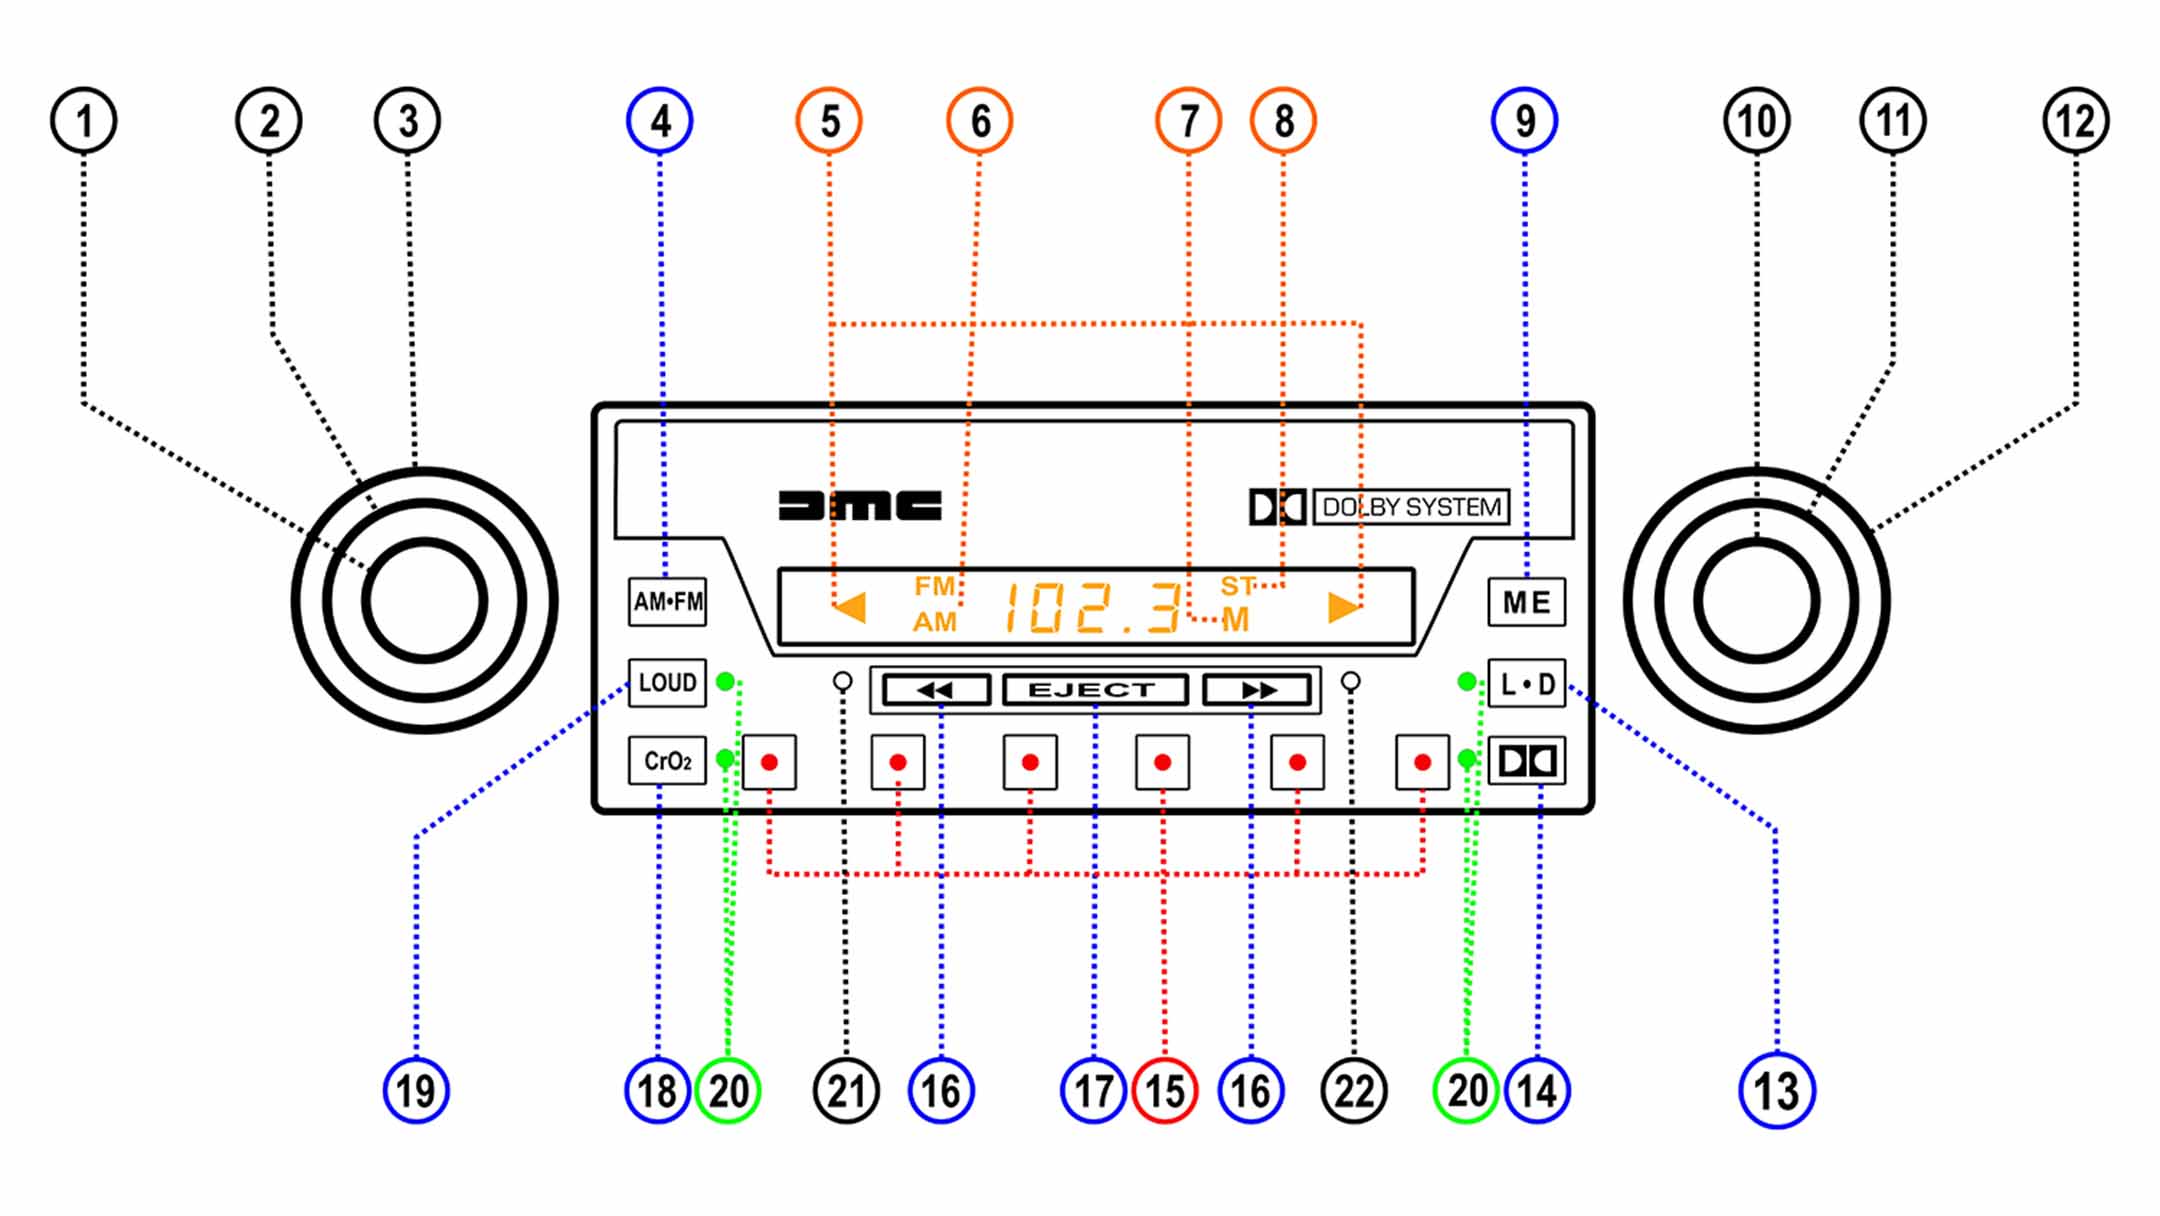
Thanks to the DeLorean community, someone out there scanned a copy of the ASI radio user manual. But, the original quality of the manual wasn’t great, so we recreated it, along with the legend map. Please do re-share and pass this around. After reading the manual, it looks like Audio Systems Inc. radio was kinda ‘high-tech’ for the day. And now you’ve ever wondered how to set the clock or what happens when you push the left knob in, here ya go. Click the cover photo for a PDF that is print-ready as a booklet, so you can print on your home printer, or at Kinko’s. Text version of the ASI manual AUDIO SYSTEMS, INC. RADIO OPERATION TO TURN TAPE PLAYER ON (1)The ON-OFF switch is combined with the VOLUME control, both of which, are operated by the front knob. Turn this knob clockwise until a “click” is heard, which indicates that the radio is now “ON”. Further clockwise rotation will increase the volume. AM / FM SELECTION (4)The desired broadcast band is selected by the “AM / FM” Selector Button which is the button marked “AM / FM”. The radio has the FM and AM band indicators (6) located to the left of the Radio Frequency display and the appropriate indicator will light up depending on whether FM or AM band is operating. MANUAL STATION TUNING (10)This radio is equipped with an electronic tuner. To tune to a station manually rotate the right front knob clockwise for up scale tuning and counterclockwise for down scale tuning. The frequency will appear on the digital display area of the radio. On the AM band the frequency will appear in the steps of 10 KHz and on the FM band the frequency will appear in steps of 0.2 MHz. Each “click” while rotating the manual tuning knob will be one step on the respective broadcast band. Tune the set carefully until you are exactly on the station. This FM receiver is equipped with an automatic muting circuit. This circuit filters out virtually all off station background noise when tuning from station to station. Also, when background noise is greater than the transmitted station signal, both the station signal and background noise are muted (filtered) out. SEEK TUNING (1)The SEEK tuning feature of this radio automatically locates the next strong station available on the radio dial when actuated. This feature operates in the up scale direction. The SEEK tuning feature is activated by pushing in the left front knob when in the radio mode. The radio automatically locates the next strong station and stops. This procedure can be repeated by pushing the left front knob again. Repeat until the desired station is being received. For maximum sensitivity of Seek Tuning feature, the L/D button (12) should be in the distant position. TUNING PUSHBUTTONS (15)Each tuning pushbutton can be set to two stations, one on the AM band and one on the FM band. This provides a total of twelve stations which can be selected by pushbutton operation. Each tuning pushbutton also has a dual color LED light in its center. These lights allow the user to easily locate each pushbutton at night. The lights change from red to green to indicate the last pushbutton operated. MEMORY (9)Set pushbuttons as follows:1. Select the desired broadcast band with the AM/FM selector button (4).2. Carefully tune to the desired station with the manual tuning control (10) or by using the SEEK tuning feature (1).3. Press the top right button marked “ME” for approximately ¾ second until the orange color “M” appears on the display area (7).4. Press one of the tuning push buttons. The “M” on the display area will go out indicating the button is now preset to this station.5. Repeat steps 2-4 for the remaining buttons.6. Set the AM/FM selector button (4) to the other broadcast band and set the six push buttons in the same manner as above. NOTE: THE ELECTRONIC CONTROL FUNCTIONS IN THE RADIO WILL NOT OPERATE PROPERLY IF POWER TO THE RADIO IS INTERRUPTED. THE POWER INTERRUPTION COULD BE CAUSED BY DISCONNECTION OF THE BATTERY, OR LOW BATTERY VOLTAGE AS MAY OCCUR IN COLD WEATHER STARTING. DISCONNECTION OF THE BATTERY WILL CAUSE LOSS OF PUSHBUTTON STATION MEMORY AND THE TIME. THE MEMORY AND CLOCK WILL REQUIRE RESETTING WHEN POWER IS RESTORED. LOW BATTERY VOLTAGE WILL CAUSE FAILURE IN THE SEEK TUNING OPERATION. THE SEEK TUNING WILL OPERATE PROPERLY WHEN POWER IS RESTORED. STEREO INDICATOR LIGHT (8)An FM Stereo light, “ST”, is located on the right side of the display area. This light will glow whenever the radio is tuned to an FM stereo station who’s broadcasting signal is of sufficient strength. If the stereo signal begins to weaken the radio will automatically blend to monaural reception. The mono mode will increase the radio’s ability to receive the weak signal. As the signal strength returns to a sufficient level the radio will automatically return to the Stereo mode. LOCAL / DISTANT SELECTOR (13)The center button on the right side of the radio marked “L/D” is the Local/Distant Selector. When the small green indicator light is on, the radio in the ‘Distant’ mode. When the indicator light is off, the radio is in the ‘Local’ mode. This which allows the user to discriminate the strong (‘Local’ position) from week stations (‘Distant’ position) in the FM mode. When the radio is in the Seek Tuning mode, this feature allows the user to discriminate the strong stations from week stations on both the am and FM bands. Your radio should be in the ‘DISTANT’ mode for the best reception under most conditions, an exception would be in an urban area with tall buildings. TREBLE CONTROL (2)The trouble response can be adjusted to the desired level with the middle knob on the left side of the radio. Rotating clockwise increases the treble and rotating counterclockwise decrease is the response. There is a detent Position at the middle point of the knob’s rotation. BALANCE CONTROL
DeLorean A-Pillar Restoration
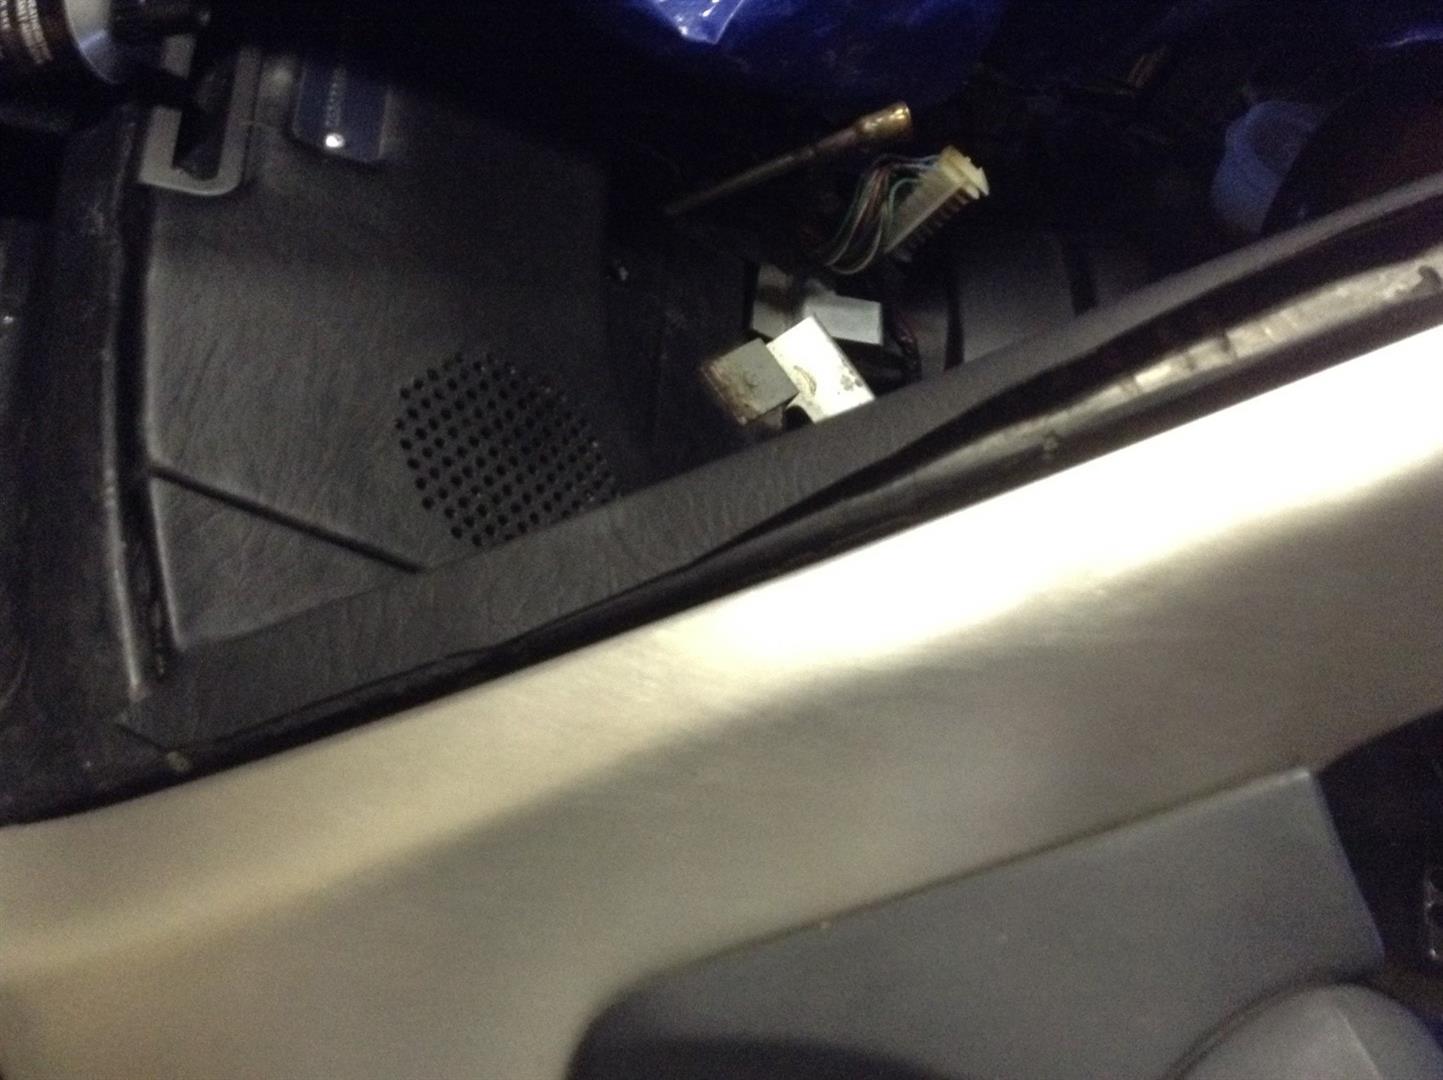
by Matt Kerns, VIN #03650 When I bought my car from upstate NY, the interior A-pillar windshield trim was deformed, pulling away, and the vinyl was hard and cracking. I decided to reshape and recover them rather than buy new ones. Steps: Remove the pillar trim by cutting the vinyl holding it to the car. I chose to remove the windshield and bracing the roof to properly remove and install the new trim, like factory gluing the vinyl, particularly under the glass. After separation, I stripped them of covering and glue, cleaning the plastic with acetone, MEK, mineral spirits, and whatever wouldn’t harm the plastic. To reshape the warped plastic, I clamped the flat side between two 1″x1″ pieces of wood, heating as I went with a low-to-medium setting on a heat gun. When I was done reforming, I left the pieces clamped for a couple days to ensure no spring back. I then traced the flat portion that was now reshaped, onto cardboard as a template, so I could transfer it to a thin 0.032 inch stiff aluminum sheet metal. I cut out the metal backing plate I just made, then glued / bonded it to the inside of the A-pillar trim using rubber cement (or any desired glue.) Note: The stock metal angle plate where the trim meets the dash is still used in conjunction with the new plate I just made, and should not be overlapped, as this will add thickness. Butt joint the two pieces. Take your desired covering material (I used automotive grade, one-way stretch-backed vinyl) and cover the plastic pillar, leaving about an inch overlap on the both sides, to wrap and glue under the windshield and under the door jamb where the door gasket fits over it. Let the glue dry completely to make sure it does not peel away from the trim piece. Dry fit the pillar on the car, wrapping the flat side-flap around/over where the glass would be, cutting the excess material off. (It should be about half-way along the frame, so about half-an-inch of material and half-an-inch of windshield surface for gluing, like the OEM.) Trimming Not pictured. I Used 3M double-sided foam tape to secure the trim to the car, sandwiched between the car and the metal plate I glued in. Use your desired glue to bond the flap to the frame (I used rubber cement.) Use Windshield glue to reinstall the windshield. *Remember to use the depth blocks to allow the right height for the shield to the body. Press on the door gaskets that overlap the vinyl and glue the vinyl to the door jamb. (I also added vinyl trim to the top of the windshield where it meets roof and headliner.) Photos:
EZ-er DeLorean Oil Changes

by Chris Miles There comes a time in DeLorean ownership when you want to make maintenance tasks more convenient. After many years of ownership certain tasks because a hassle, like changing the oil. As most of us know, the stock oil drain plug is a bit of an odd duck. It takes a specially tool to remove the plug. This is especially troublesome if you elect to take the car to a shop to get an oil change. Not only do you need to carry the tool with you, you have to explain to the shop techs not to wrench down on the plug. One of the coolest upgrades I’ve come across for the car is the “EZ Oil drain valve”, sold by Toby Petersen at DeLorean Parts Northwest. It replaces the stock oil pan plug with a convenient valve that allow you to drain your oil effortlessly. No longer do you have to worry about special tools, copper crush washers, or stripping the drain plug socket.Toby has teamed up with EZ drain valve people to come up with a kit especially for the DeLorean. When you get the kit, you’ll find the valve body, an adapter, and two blue fiber washers. Once it’s all assembled on the car you should have a tight seal with no leaks. Due to the limited space between the oil pan and the frame crossmember, it’s a tight fit, but it all works. Once the valve is fitted, you won’t have to mess with it again. [flickr_tags tags=”post-3637″]
DeLorean Owner’s Handbook

The DeLorean Owner’s Handbook below is the 1982 version. Learn more about the other versions of the DeLorean Owners Manuals.
Hi-Resolution DeLorean Relay and Fuse diagram
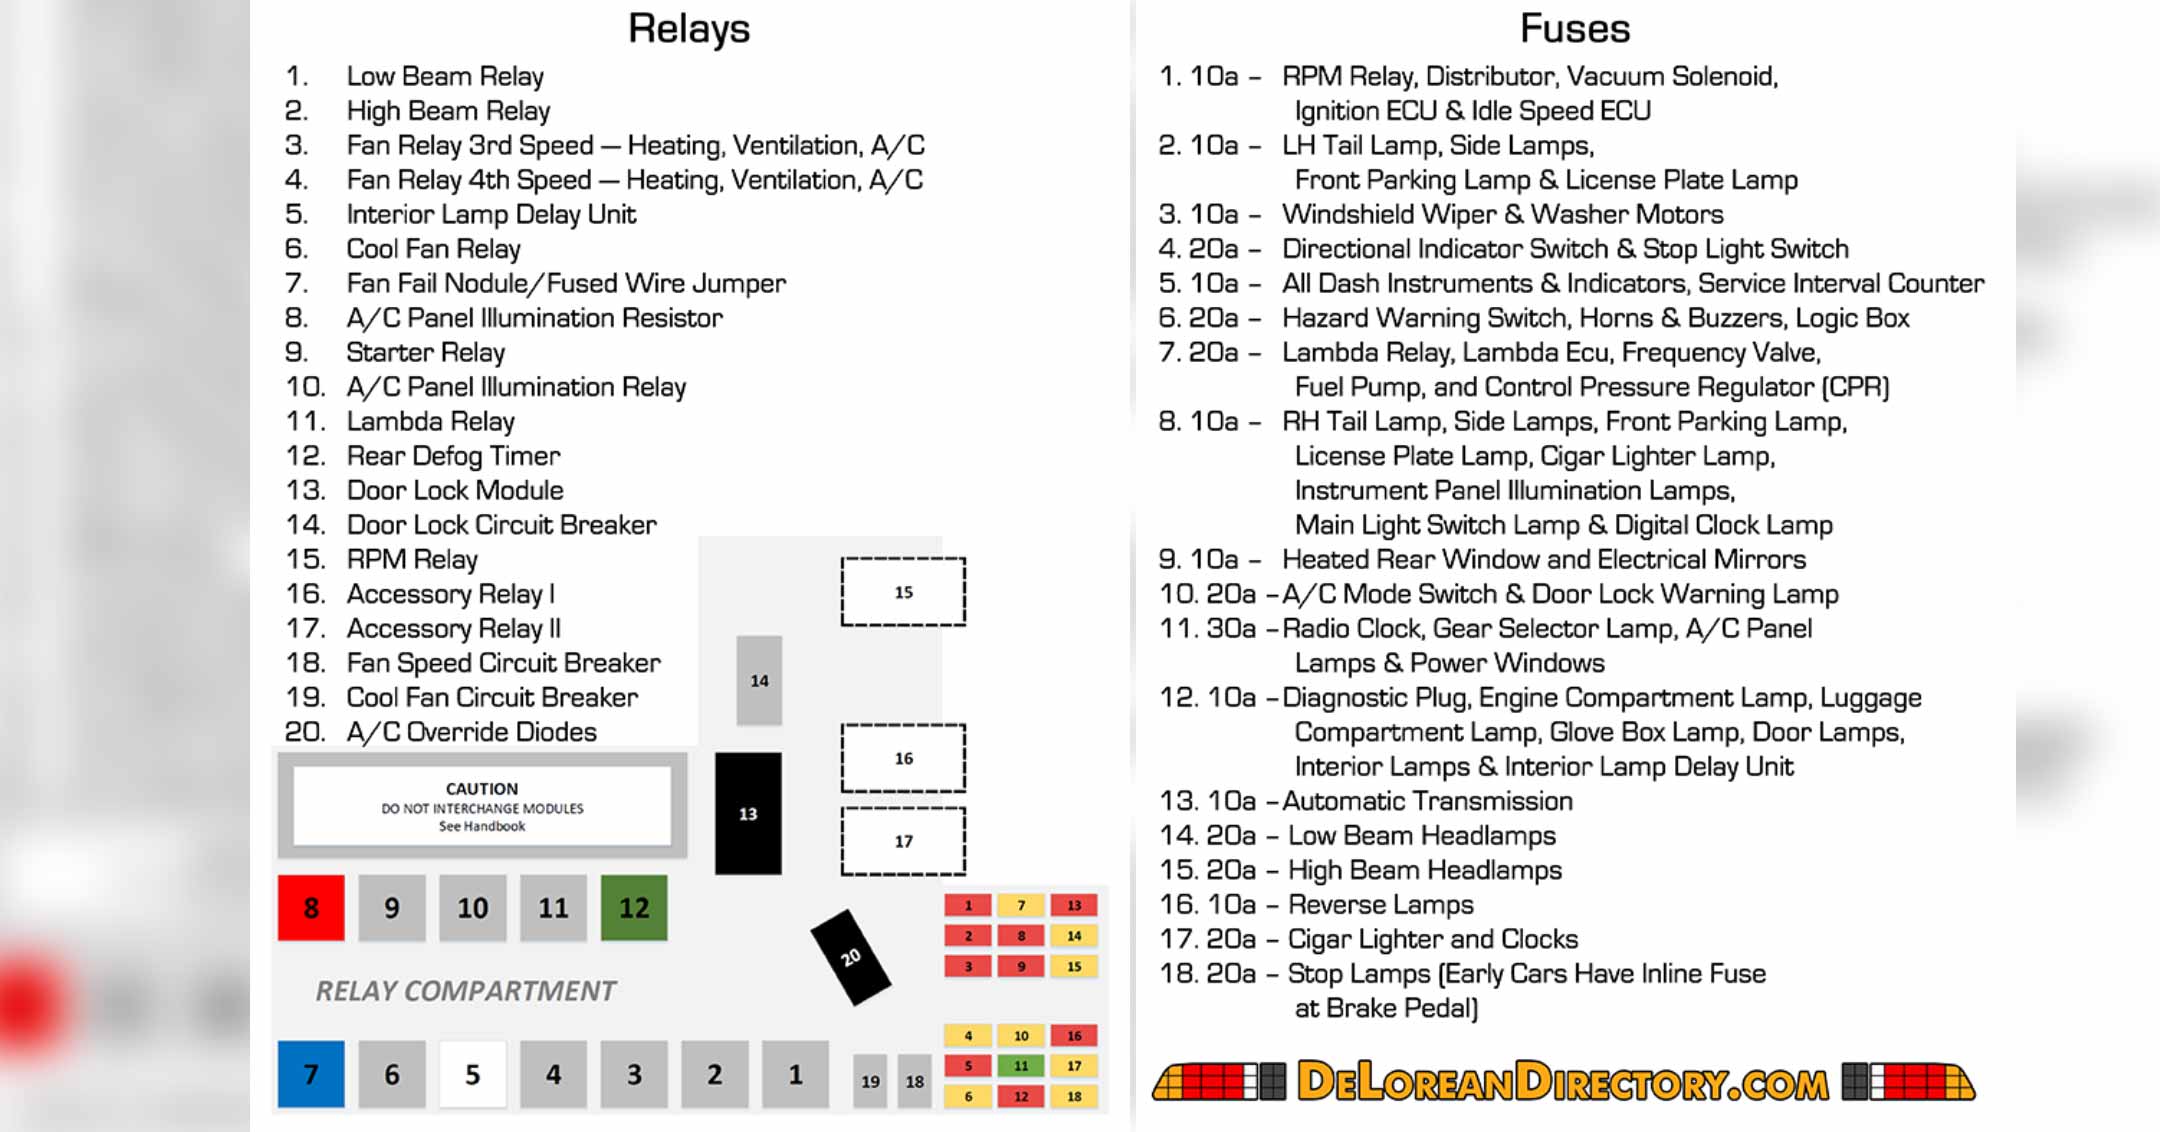
A hi-res, full-page printable DeLorean relay and fuse diagram. (Click here for PDF version.)