


To LoJack, or Not to LoJack…
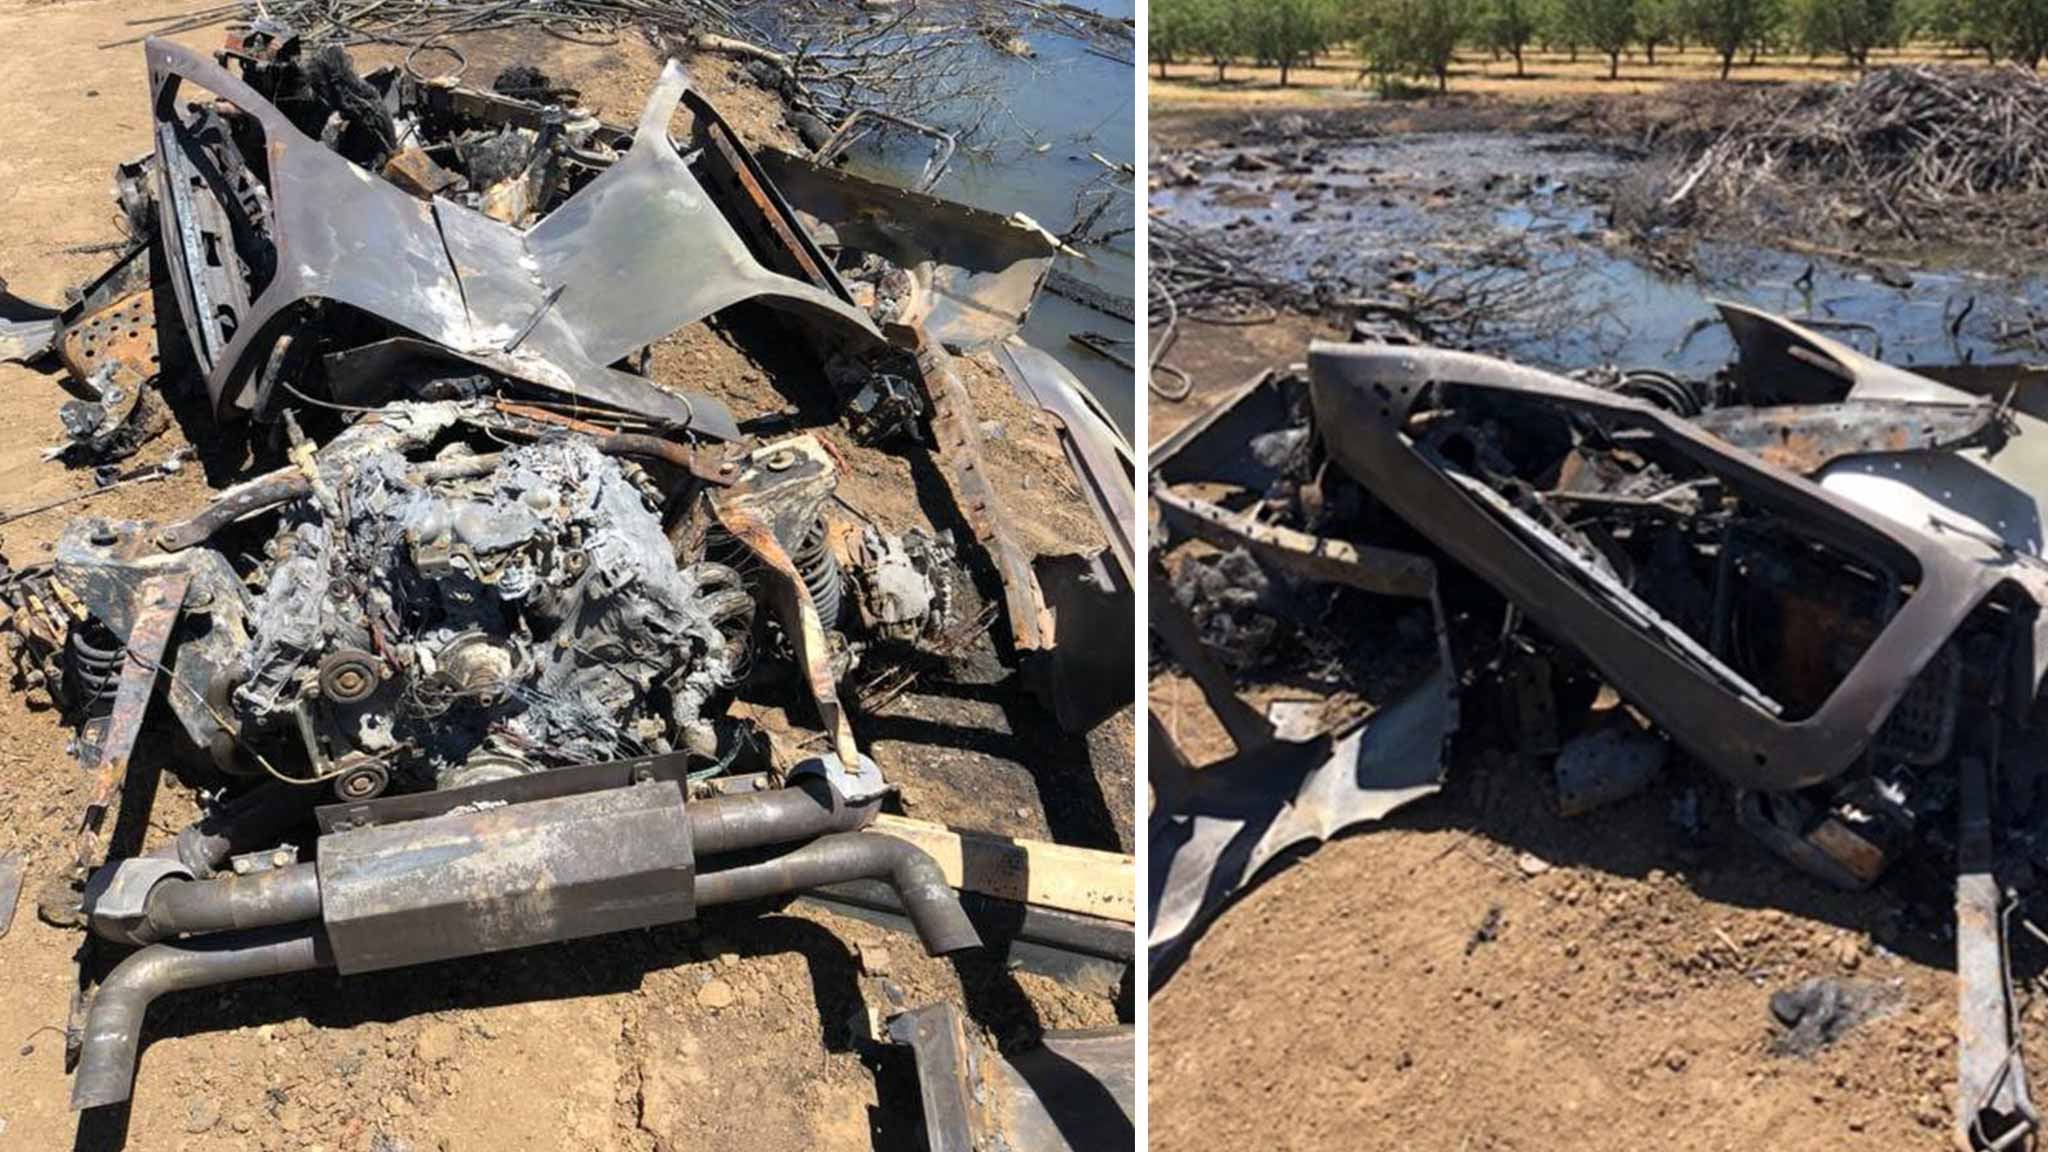
We all know that DeLoreans aren’t stolen… well… ever (statistically.) But as we recently saw with Mike Persyn’s truck being stolen, while towing VIN #05984, it can happen. And with only about 4,000 DeLoreans left in the world, the question is, should we consider installing tracking devices on our cars? Which is quickly followed up with, ‘Is it worth the money?’; ‘What devices should I consider?’; ‘What will it cost me over time?’ After looking at a lot of vehicle tracking devices and options, the short answer seems to be: LoJack. Q&A? Below is an email from June 5, 2018 directly from LoJack with details. (View the PDF of the email)
DeLorean RPM Relay

by Chris Miles The RPM relay is essential for fuel pump operation. It powers the fuel pump when it detects an RPM signal, meaning there’s an ignition signal, and the engine is turning over. It’s a black six pin relay usually found mounted to the underside of the relay tray behind the passenger seat. Or, just look for the large relay similar to this photo. If the relay fails, you can be left stranded, and you likely won’t get a warning of a failing RPM relay ahead of time. To avoid RPM relay issues, I recommend buying Dave McKeen’s solid state RPM relay (https://dm-eng.weebly.com – use the “Contact Email” link at the top of his page for pricing). Unlike the original RPM relay, McKeen’s solid state relay runs cool and will essentially last forever. Since the RPM relay is essential for running the car, why rely on a 30+ year old piece of technology. Dave will rebuild your original relay with solid state components, or you can send him a compatible relay to rebuild. Search eBay and other websites for Volvo relays. You can also go to junkyards and search for 1980s Volvos (commonly Volvo 240s) for compatible relay cores. If you send McKeen one of the Volvo relays, you can keep your original DMC relay as a spare. Alternatively, please see my for sale link here (RPM Relay Core),if you would like to buy a relay core from me. This photo gives you an idea of what to look for on the INSIDE of the Volvo relays. Make sure the pins “stacked” when they attach to the circuit board. Other relays cannot be re-used for McKeen’s conversion. I’ve been using these relays in both of my DeLoreans since about 2010 and they work great. If you don’t want to spend the money for McKeen’s relay, it’s not a bad idea to make a three-wire lead you can use to jumper the RPM relay socket in case of emergency. The three wires are all connected to each other at the top (so that they make a single circuit,) and when plugged in as the photo shows, the fuel pump circuit will be powered – allowing you to get home and buy a new RPM relay.
DeLorean Alternator Tensioner
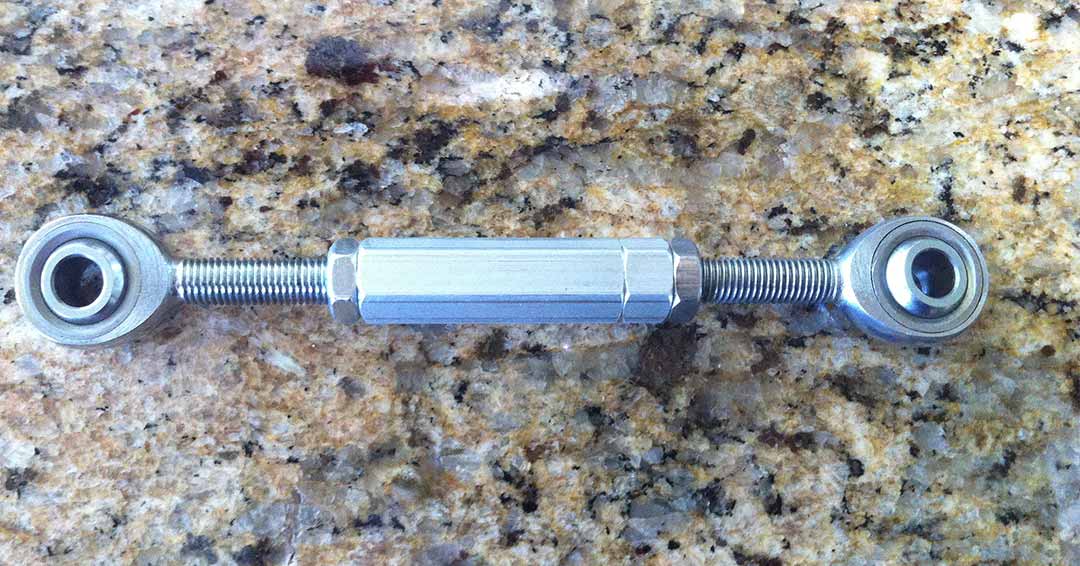
by Chris Miles If you’ve ever had to replace the alternator / water pump belt (or just adjust it,) you know what a pain it is – especially if you’re broken down on the side of the road! So, to make it easier, I have been using a turnbuckle style alternator tensioner. It’s made from parts sourced from McMaster Carr. You don’t need to install this now, but it’s a good idea to have it in your car, so that you can install it the next time you replace the belt. (You SHOULD have a spare belt in the car too – Gates #7495 – www.rockauto.com/en/moreinfo.php?pk=3913&jsn=10393) You’ll be replacing the existing alternator tensioner bracket (DMCT Part#: 110102) with this new tensioner. Here are the parts you’ll need to build this replacement bracket: Remember, you’ll also need a long enough bolt to go through the rod end into the alternator itself. Check your YOUR alternator bolt size, and get one about 1/2″ longer than the current size. The coupler accepts a ½ inch open-end wrench. Simply rotate the coupler to extend the tensioner, which pushes the alternator away from the water pump pulley, thus tightening the belt. I’ve been using these on both of my DeLoreans for years, and have never had an adjustment problem. At the time of this writing, the rod ends were about $14 each, and the coupler nut was $18. The jam nuts are probably less than $1 each. For about $50, you can have piece of mind that you can replace your broken or damaged alternator belt on the side of the road quickly and easily.
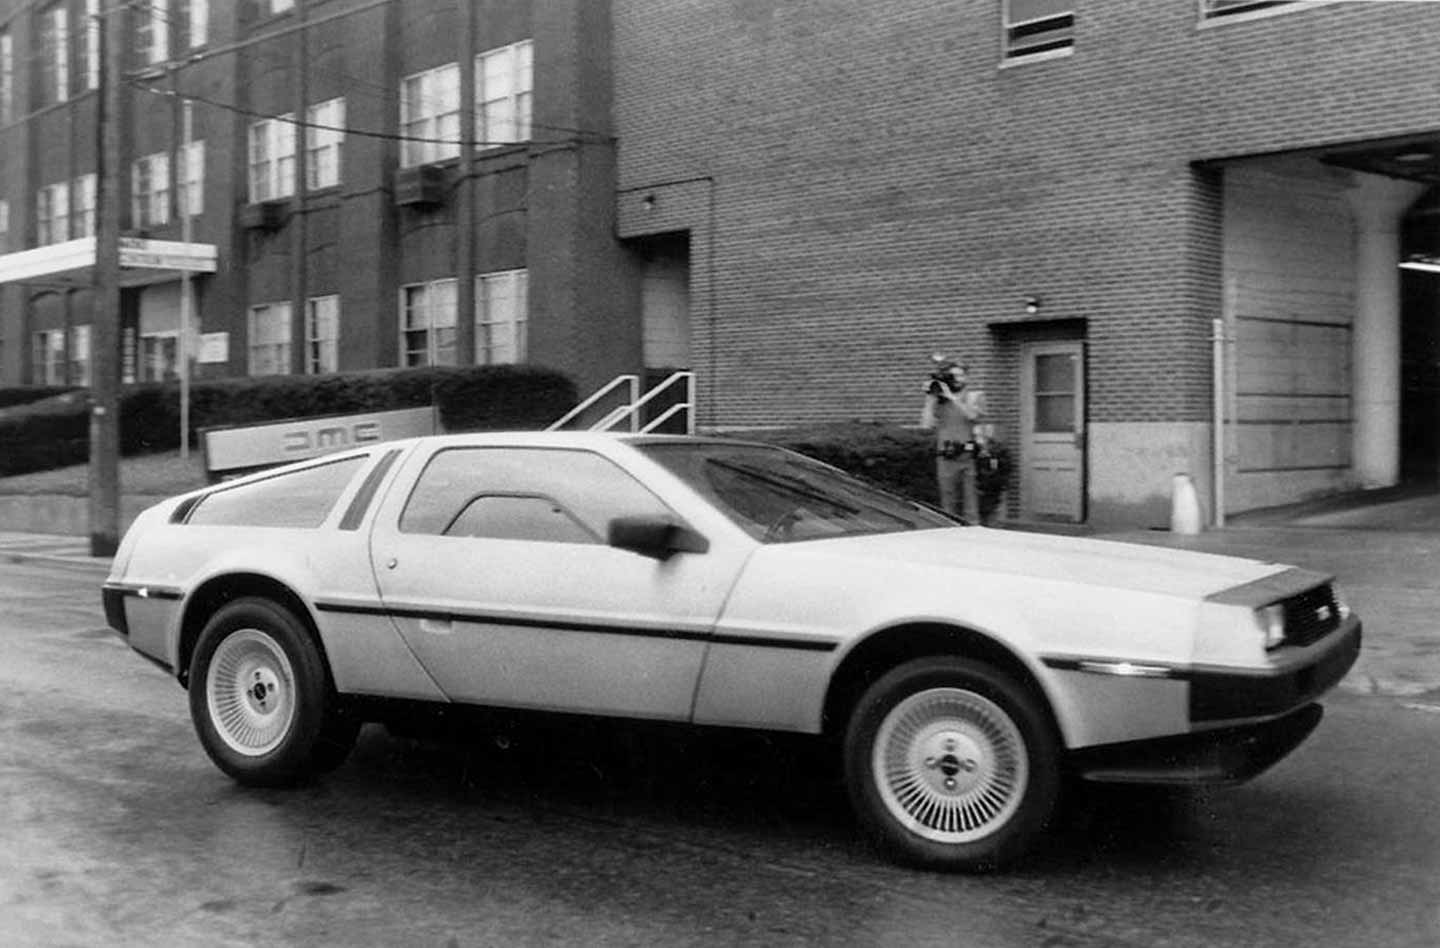
Don’t trust a DeLorean seller who won’t share the VIN

When you’re looking to buy a DeLorean and doing online research, don’t trust a business (or individual) that hides the VIN in their listing. VIN theft is a real thing – for mass-produced cars. Not for DeLoreans. There are no bar codes or ODB II computers in a DeLorean. No one is going to clone a DeLorean VIN. Therefore, there is no reason to keep a DeLorean VIN private/secret – unless you’re trying to hide information about the car. Any half-intelligent car dealer knows this, especially ones who deal with rare or classic cars. So the short of it is, if a dealer doesn’t, or won’t list the VIN of a DeLorean they are selling on their website, BEWARE! There are a few “car club” dealers around the world who frequently sell DeLoreans. Most of the time those cars are in bad to extremely poor condition. And most of those dealers only share their stock number on the listing, most likely to keep potential buyers from discovering the history (and sometimes the truth) about that vehicle. Some of these “car clubs” have refused to post the VIN on their listings citing potential VIN theft as the reason. To reiterate, that argument doesn’t work for DeLoreans. The dealer is more than likely just looking for a sucker to buy the car (for an inflated price.) So WHY is it important for car dealers and private owners to post the VIN of the DeLoreans they sell online? Because the community that surrounds the DeLorean is vast, and there are many, many people who follow these cars, and who know when something doesn’t look right. We’ll take care of our brand. We don’t want bad actors pulling scams with our cars. When someone is looking to buy a DeLorean, they almost always look on the web. When a car comes up for sale, other DeLorean owners can be a big help in making sure a potential new owner doesn’t get taken advantage of in the sale. Plus, on the extremely rare occasion of DeLoreans being stolen in the past, it’s the whole car – not just the VIN. Luckily, eBay requires the VIN when listing cars. Again, for mass-produced cars the VIN cloning issue is real. As of 2015, cloning theft cost Americans around $12 million each year. But that’s for mass-market cars that are stolen and can be folded into the mix of hundreds-of-thousands of the exact same car. That just doesn’t happen in the DeLorean community. Even the new DeLorean Motor Company lists the VIN (only the last 5 numbers matter) on the cars they sell. There’s no excuse, rhyme, or reason for a DeLorean seller to hide the VIN. Note to DeLorean sellers: At the very least, include the last 5 digits of the VIN. Better is to include the full VIN. Best is to have a photo of the door VIN plate. Do this, and your sale will go well.
DMC Columbus, OH
Google Street View: 394 W. Nationwide Blvd., Columbus, OH 43215 (Originally 400 Dublin Avenue) From Hemmings Daily – “When De Lorean moved to Columbus Daniel Strohl on May 17th, 2012″ When De Lorean moved to Columbus Daniel Strohl on May 17th, 2012 Columbus, Ohio, isn’t widely regarded as a center of automotive manufacturing, and rightly so: Of the 10 or so manufacturers that actually proceeded with automobile production in the city, all had disappeared by the mid-1920s and only about four of them built automobiles for more than a couple of years. Yet one company – DeLorean – thought Columbus would make for a fine place to build some cars call home in the 1980s. Yes, DeLorean built the majority of its cars in Dunmurry, Northern Ireland, before the company went bankrupt following the October 1982 arrest of John DeLorean on drug trafficking charges. According to a DeLorean Museum, DeLorean Motor Company built 9,200 DMC-12s in Northern Ireland between January 1981 and December 1982. Those latter months of 1982 proved a turbulent time for De Lorean, both the man and the company, but they also saw the arrival on the scene of Sol A. Shenk, a Russian immigrant to the United States, who in 1967 started a business selling closeout and overstock car parts; the business, Consolidated Stores, took off when Shenk switched to household goods and became the company that runs Big Lots and Odd Lots stores across the country. Following the demise of Malcolm Bricklin’s eponymous car company in late 1975, Shenk swooped in to buy its remains and sold off the 300 finished cars along with the leftover parts inventory. “He’s doing all right with Bricklin,” David Brownell told the New York Times years later. “He’s the sole source for Bricklin parts, and since parts fall off Bricklins with some regularity, it’s a good business.” Shenk and business partner Jerome Schottenstein wouldn’t wait until DeLorean went belly-up to invest in that company, however. In March or April of 1982, when Bank of America seized 1,400 DMC-12s because DeLorean hadn’t made payments on a loan, Shenk paid the bank $18 million and took a stake in De Lorean Motor Company. Then just days after John DeLorean’s arrest, Shenk hopped a plane to Northern Ireland to begin discussions about buying out the remains of the company. By mid-November, Shenk struck a deal, beating out the offer made by John DeLorean’s brother, Charles. Shenk would pay the company $1.5 million and assume another $8.7 million in debt and in turn receive $1.2 million worth of parts, the exclusive U.S. distribution rights for cars and parts, and $17.5 million worth of unsold cars. That appears to include 649 unsold DMC-12s, part of Shenk’s earlier investment into De Lorean, but the total number of cars seems to vary by source, anywhere from 1,041 to 2,800. Shenk initially said he wouldn’t liquidate De Lorean; instead, he intended to continue production on a scaled-back basis in Northern Ireland. “It’s a beautiful plant,” he told the AP in mid-November. “I think that there is an opportunity here to sell cars at a very good price. (John DeLorean) was a big man. I’m a little guy. All I want to do is sell cars.” Before the end of the year, though, he’d change his tune after analysts told him the car couldn’t be sold at a profit at the price DeLorean had previously been selling it. “I don’t think there’s much hope – there’s any hope – for the car being built,” he said. “I think it’s a wonderful car, and it’s a shame such a well-built car will not be able to be produced.” Almost immediately, Shenk began to ship the leftover cars and parts to the United States – specifically to a warehouse or two on Dublin Avenue in downtown Columbus. Discussion on some old De Lorean mailing lists indicates one of the warehouses was located at 319 Dublin Avenue, but thanks to PhotOhio.org – where we found these several photographs of De Lorean in Columbus – we see that the Columbus De Lorean operations centered around 400 Dublin Avenue, a very appropriate location. At least two of Columbus’s more successful auto manufacturers occupied that building: the Columbus Buggy Company, which produced the Columbus Electric, the Buggymobile, and the Firestone-Columbus from 1903 to May 1915; and Allen, which bought the property from he Columbus Buggy Company and operated out of that location from 1915 through 1922. From the new Columbus digs, Shenk then hired another company, KAPAC, to distribute the remaining DeLorean parts inventory. The remaining DMC-12s he sold off directly and through existing dealers. Shenk must have had more demand for the cars than he expected – according to DeLoreanMuseum.org, he hired former De Lorean factory managers to come to Columbus and assemble about 100 more cars from leftover components, including the very last DMC-12http://bigtexas.com/dmc/gold/, assembled from leftover gold-plated parts in 1983 and used for a promotional giveaway at Big Lots retail stores. Woman filling out an entry form for a drawing for the last De Lorean built outside a Big Lots store. How long it took Shenk to sell the cars remains unclear, but by September 1983, Shenk noted that he had sold about two-thirds of the cars and had only a few hundred left. Shenk died in 1994 and three years later KAPAC sold the remaining parts inventory, production and distribution rights, and engineering drawings to Stephen Wynne of De Lorean Motor Company in Texas, who in recent years has resumed De Lorean production much as Shenk did – by assembling cars from leftover parts. UPDATE (18.May 2012): James Espy of the Texas DeLorean Motor Company noted that the 100 or so cars that Shenk had built were built in Northern Ireland, not in Columbus.
ASI Radio User Manual
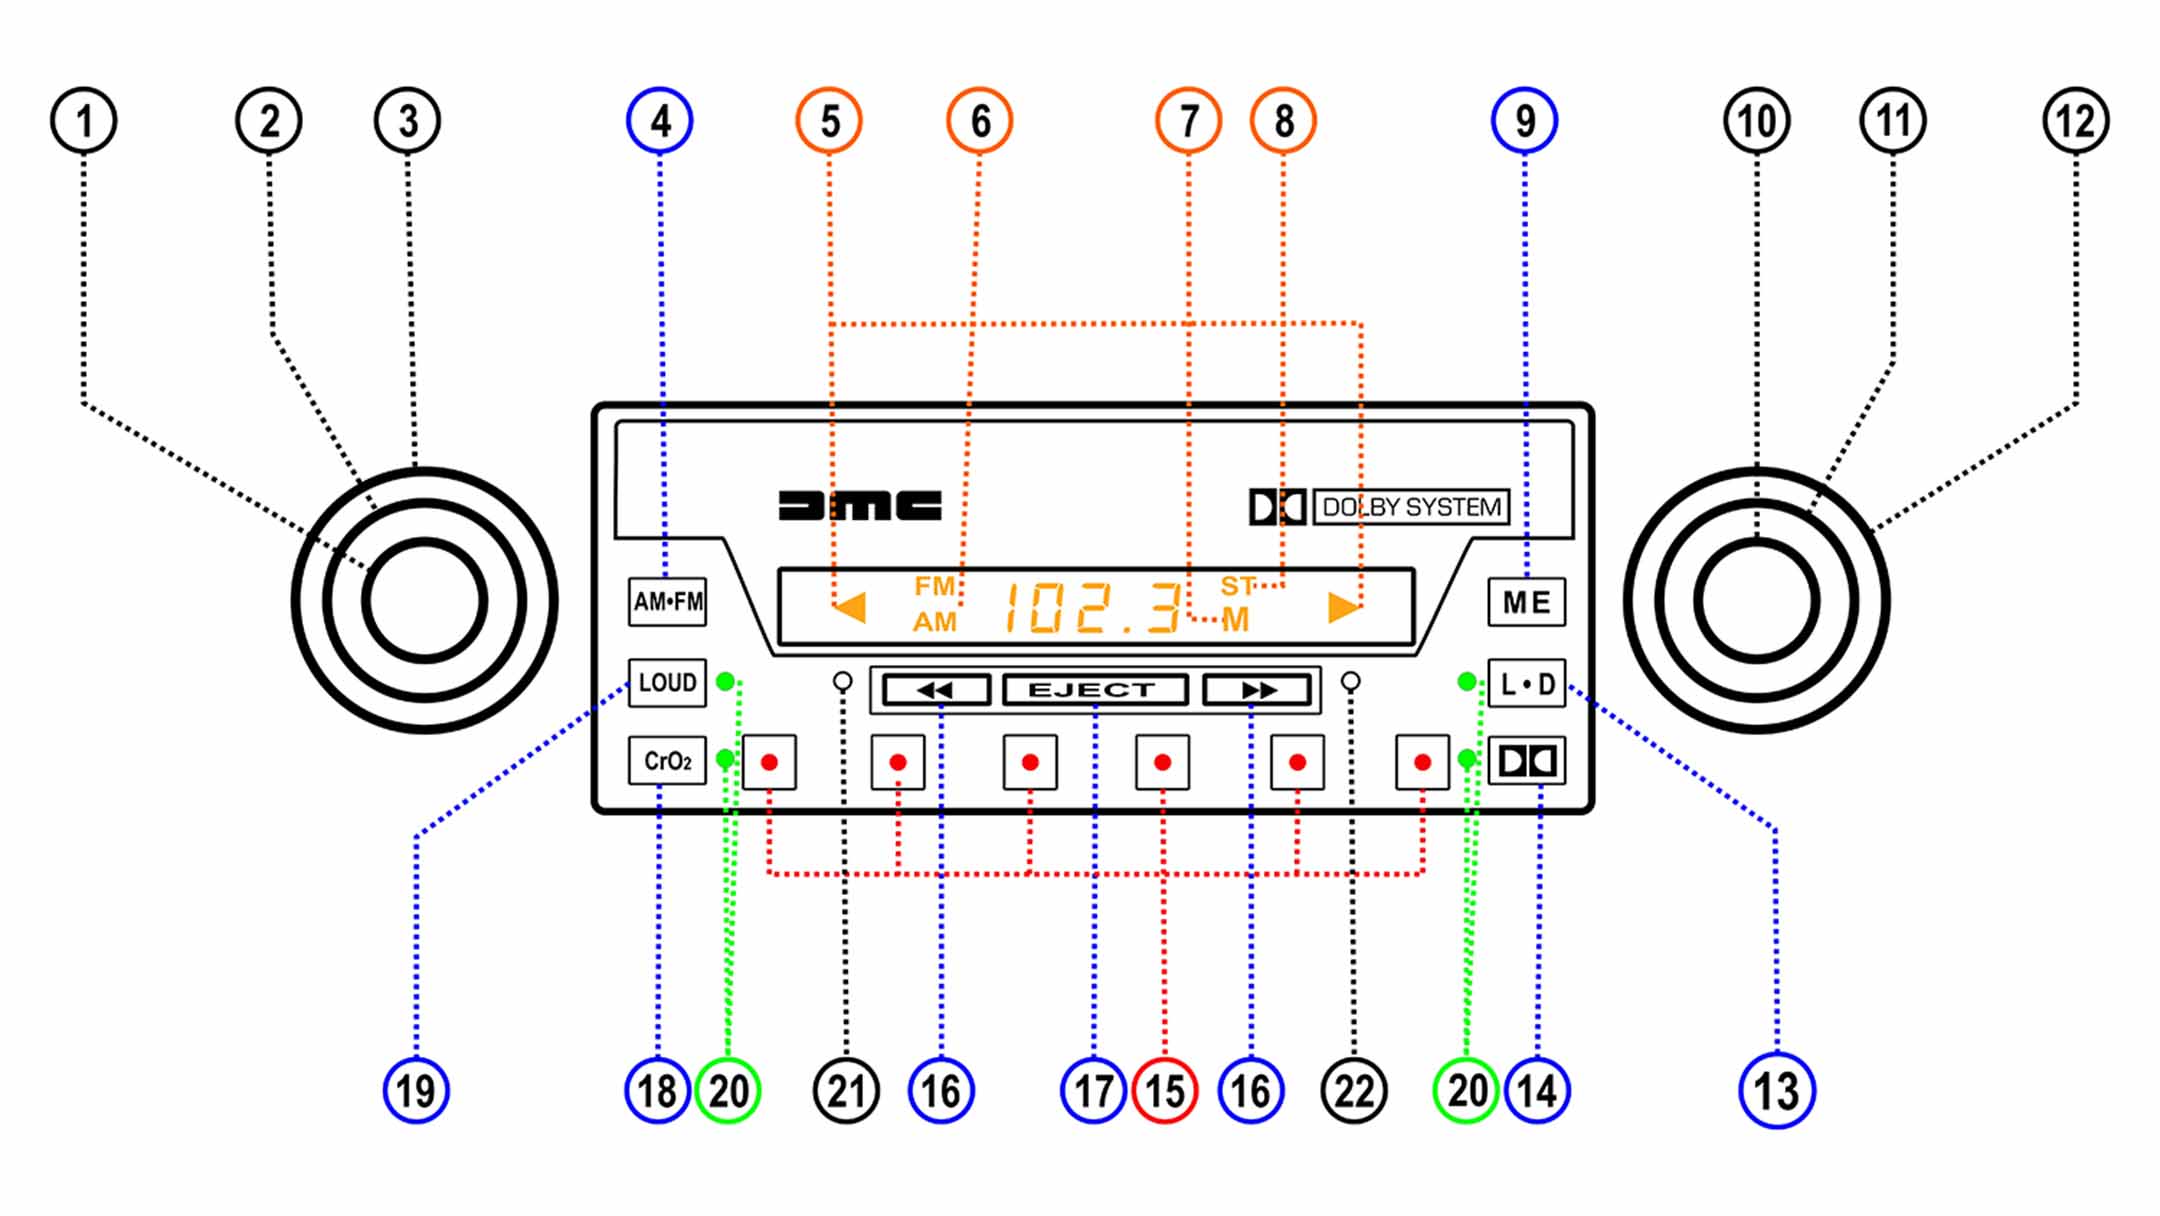
Thanks to the DeLorean community, someone out there scanned a copy of the ASI radio user manual. But, the original quality of the manual wasn’t great, so we recreated it, along with the legend map. Please do re-share and pass this around. After reading the manual, it looks like Audio Systems Inc. radio was kinda ‘high-tech’ for the day. And now you’ve ever wondered how to set the clock or what happens when you push the left knob in, here ya go. Click the cover photo for a PDF that is print-ready as a booklet, so you can print on your home printer, or at Kinko’s. Text version of the ASI manual AUDIO SYSTEMS, INC. RADIO OPERATION TO TURN TAPE PLAYER ON (1)The ON-OFF switch is combined with the VOLUME control, both of which, are operated by the front knob. Turn this knob clockwise until a “click” is heard, which indicates that the radio is now “ON”. Further clockwise rotation will increase the volume. AM / FM SELECTION (4)The desired broadcast band is selected by the “AM / FM” Selector Button which is the button marked “AM / FM”. The radio has the FM and AM band indicators (6) located to the left of the Radio Frequency display and the appropriate indicator will light up depending on whether FM or AM band is operating. MANUAL STATION TUNING (10)This radio is equipped with an electronic tuner. To tune to a station manually rotate the right front knob clockwise for up scale tuning and counterclockwise for down scale tuning. The frequency will appear on the digital display area of the radio. On the AM band the frequency will appear in the steps of 10 KHz and on the FM band the frequency will appear in steps of 0.2 MHz. Each “click” while rotating the manual tuning knob will be one step on the respective broadcast band. Tune the set carefully until you are exactly on the station. This FM receiver is equipped with an automatic muting circuit. This circuit filters out virtually all off station background noise when tuning from station to station. Also, when background noise is greater than the transmitted station signal, both the station signal and background noise are muted (filtered) out. SEEK TUNING (1)The SEEK tuning feature of this radio automatically locates the next strong station available on the radio dial when actuated. This feature operates in the up scale direction. The SEEK tuning feature is activated by pushing in the left front knob when in the radio mode. The radio automatically locates the next strong station and stops. This procedure can be repeated by pushing the left front knob again. Repeat until the desired station is being received. For maximum sensitivity of Seek Tuning feature, the L/D button (12) should be in the distant position. TUNING PUSHBUTTONS (15)Each tuning pushbutton can be set to two stations, one on the AM band and one on the FM band. This provides a total of twelve stations which can be selected by pushbutton operation. Each tuning pushbutton also has a dual color LED light in its center. These lights allow the user to easily locate each pushbutton at night. The lights change from red to green to indicate the last pushbutton operated. MEMORY (9)Set pushbuttons as follows:1. Select the desired broadcast band with the AM/FM selector button (4).2. Carefully tune to the desired station with the manual tuning control (10) or by using the SEEK tuning feature (1).3. Press the top right button marked “ME” for approximately ¾ second until the orange color “M” appears on the display area (7).4. Press one of the tuning push buttons. The “M” on the display area will go out indicating the button is now preset to this station.5. Repeat steps 2-4 for the remaining buttons.6. Set the AM/FM selector button (4) to the other broadcast band and set the six push buttons in the same manner as above. NOTE: THE ELECTRONIC CONTROL FUNCTIONS IN THE RADIO WILL NOT OPERATE PROPERLY IF POWER TO THE RADIO IS INTERRUPTED. THE POWER INTERRUPTION COULD BE CAUSED BY DISCONNECTION OF THE BATTERY, OR LOW BATTERY VOLTAGE AS MAY OCCUR IN COLD WEATHER STARTING. DISCONNECTION OF THE BATTERY WILL CAUSE LOSS OF PUSHBUTTON STATION MEMORY AND THE TIME. THE MEMORY AND CLOCK WILL REQUIRE RESETTING WHEN POWER IS RESTORED. LOW BATTERY VOLTAGE WILL CAUSE FAILURE IN THE SEEK TUNING OPERATION. THE SEEK TUNING WILL OPERATE PROPERLY WHEN POWER IS RESTORED. STEREO INDICATOR LIGHT (8)An FM Stereo light, “ST”, is located on the right side of the display area. This light will glow whenever the radio is tuned to an FM stereo station who’s broadcasting signal is of sufficient strength. If the stereo signal begins to weaken the radio will automatically blend to monaural reception. The mono mode will increase the radio’s ability to receive the weak signal. As the signal strength returns to a sufficient level the radio will automatically return to the Stereo mode. LOCAL / DISTANT SELECTOR (13)The center button on the right side of the radio marked “L/D” is the Local/Distant Selector. When the small green indicator light is on, the radio in the ‘Distant’ mode. When the indicator light is off, the radio is in the ‘Local’ mode. This which allows the user to discriminate the strong (‘Local’ position) from week stations (‘Distant’ position) in the FM mode. When the radio is in the Seek Tuning mode, this feature allows the user to discriminate the strong stations from week stations on both the am and FM bands. Your radio should be in the ‘DISTANT’ mode for the best reception under most conditions, an exception would be in an urban area with tall buildings. TREBLE CONTROL (2)The trouble response can be adjusted to the desired level with the middle knob on the left side of the radio. Rotating clockwise increases the treble and rotating counterclockwise decrease is the response. There is a detent Position at the middle point of the knob’s rotation. BALANCE CONTROL
DeLorean A-Pillar Restoration

by Matt Kerns, VIN #03650 When I bought my car from upstate NY, the interior A-pillar windshield trim was deformed, pulling away, and the vinyl was hard and cracking. I decided to reshape and recover them rather than buy new ones. Steps: Remove the pillar trim by cutting the vinyl holding it to the car. I chose to remove the windshield and bracing the roof to properly remove and install the new trim, like factory gluing the vinyl, particularly under the glass. After separation, I stripped them of covering and glue, cleaning the plastic with acetone, MEK, mineral spirits, and whatever wouldn’t harm the plastic. To reshape the warped plastic, I clamped the flat side between two 1″x1″ pieces of wood, heating as I went with a low-to-medium setting on a heat gun. When I was done reforming, I left the pieces clamped for a couple days to ensure no spring back. I then traced the flat portion that was now reshaped, onto cardboard as a template, so I could transfer it to a thin 0.032 inch stiff aluminum sheet metal. I cut out the metal backing plate I just made, then glued / bonded it to the inside of the A-pillar trim using rubber cement (or any desired glue.) Note: The stock metal angle plate where the trim meets the dash is still used in conjunction with the new plate I just made, and should not be overlapped, as this will add thickness. Butt joint the two pieces. Take your desired covering material (I used automotive grade, one-way stretch-backed vinyl) and cover the plastic pillar, leaving about an inch overlap on the both sides, to wrap and glue under the windshield and under the door jamb where the door gasket fits over it. Let the glue dry completely to make sure it does not peel away from the trim piece. Dry fit the pillar on the car, wrapping the flat side-flap around/over where the glass would be, cutting the excess material off. (It should be about half-way along the frame, so about half-an-inch of material and half-an-inch of windshield surface for gluing, like the OEM.) Trimming Not pictured. I Used 3M double-sided foam tape to secure the trim to the car, sandwiched between the car and the metal plate I glued in. Use your desired glue to bond the flap to the frame (I used rubber cement.) Use Windshield glue to reinstall the windshield. *Remember to use the depth blocks to allow the right height for the shield to the body. Press on the door gaskets that overlap the vinyl and glue the vinyl to the door jamb. (I also added vinyl trim to the top of the windshield where it meets roof and headliner.) Photos:
Free Posters

Want some FREE DeLorean posters you can get printed at your local Walgreens for local pickup? Scroll down to see all the posters! DeLorean Patent poster These print great at 24″ x 36″ – DeLorean Patent Publication Goodyear NCT Tire poster This prints great at 16″ x 20″. Concours DeLorean poster This prints well at 18″ x 24″. July 27, 1986 Concours DeLorean sponsored by DeLorean One. DeLorean Cutaway poster This prints well at 12″ x 14″.
EZ-er DeLorean Oil Changes

by Chris Miles There comes a time in DeLorean ownership when you want to make maintenance tasks more convenient. After many years of ownership certain tasks because a hassle, like changing the oil. As most of us know, the stock oil drain plug is a bit of an odd duck. It takes a specially tool to remove the plug. This is especially troublesome if you elect to take the car to a shop to get an oil change. Not only do you need to carry the tool with you, you have to explain to the shop techs not to wrench down on the plug. One of the coolest upgrades I’ve come across for the car is the “EZ Oil drain valve”, sold by Toby Petersen at DeLorean Parts Northwest. It replaces the stock oil pan plug with a convenient valve that allow you to drain your oil effortlessly. No longer do you have to worry about special tools, copper crush washers, or stripping the drain plug socket.Toby has teamed up with EZ drain valve people to come up with a kit especially for the DeLorean. When you get the kit, you’ll find the valve body, an adapter, and two blue fiber washers. Once it’s all assembled on the car you should have a tight seal with no leaks. Due to the limited space between the oil pan and the frame crossmember, it’s a tight fit, but it all works. Once the valve is fitted, you won’t have to mess with it again. [flickr_tags tags=”post-3637″]
DeLorean Owners – Get Ready… for Ready Player One

Okay DeLorean owners and DeLorean clubs… if you want to have some FUN with your car, you need to talk the general manager at your local movie theater NOW to setup something for March 30, 2018… The Ready Player One movie is going to be VERY popular, and having DeLoreans parked in front of the theater on opening day will be fun for everyone. Be it a DeLorean car show, or even just a single car. If you or your club DO coordinate with your local movie theater, be sure to create a Facebook event so that it’s easy to share, and easy for others to find out about it – and email DeLorean Directory so we can share it too. Stop by your local movie theaters and talk to a manager to see if you can work something out. Click here for a list of movie theaters in your area.